Hardware Compatibility List
|
|
XenServer 9 Server Certification Kit Guide
DownloadPublished Feb 2026
V9.0.0 Edition
Table of Contents
- Introduction
- Prerequisites
- XenServer Installation
- Droid VM Prepare
- Server Certification Kit Installation
- Setting up the network configuration
- Server Certification Kit Operation
- Submitting results and logs to Citrix
- Bug Reports and Feedback
- Troubleshoot
- My VLAN test network_tests.VLANTestClass.test_vlan_high_port failed.
- My MTU test network_tests.MTUPingTestClass.test_ping fails.
- My Multicast test network_tests.MulticastTestClass fails.
- My SR-IOV test network_tests.InterHostSRIOVTestClass, IntraHostSRIOVTestClass1, or IntraHostSRIOVTestClass2 fails?
- Few tests have failed. I don't want to run the full kit all over again. Is there a way to run just these failed tests?
Introduction
The Server Certification Kit is an automated test harness for certifying servers, network cards and local storage devices for use with XenServer.
The certification kit is designed to run automatically once the user has correctly configured their server, and external environment according to the instructions given below.
Whilst we do our best to ensure the certification kit is bug free, we are still working on improving the certification kit's robustness – if you encounter any issues, then we’d ask that you raise an appropriate bug ticket for us to investigate. XenServer is committed to improving both the certification kit's quality, and value to both vendors and itself.
A number of vendors have expressed interested in integrating this certification kit into their own test systems – as much as possible we have designed the certification kit to be easy to integrate. If you feel there could be modifications made to the certification kit that would improve its usefulness for you – then please let us know.
If you are interested in contributing improvements to the certification kit, then please take a look at the project on GitHub: https://github.com/xenserver/auto-cert-kit
Note:
Multicast, SR-IOV, and VLAN tests are optional. Ignore the corresponding test results if you do not want to certify those features.
Prerequisites
- Required
- XenServer Pool - Set up a XenServer pool consisting of two hosts, both running the version of XenServer that is being certified.
- Certification kit Installation - Install the server certification kit on both the pool coordinator and the pool member hosts.
- Droid VM - Create a VM template, which will be used in the test for generating test VM (we call it Droid VM)
- Network Adaptors - Each host requires a minimum of two network interfaces. Three or more are recommended (one dedicated for management, at least two for testing). The management interface can be used for testing if needed. Bonding tests require at least two interfaces on the same Layer 2 network. The corresponding test interfaces on each host are expected to be plugged into the same Layer 2 network.
-
Large MTU – For network adaptor testing, configure switch ports to allow 9000-byte packets (jumbo frames) without fragmentation.
-
Optional (only if you want to certify the corresponding feature)
- Multicast - Ensure the network device in the test environment supports multicast.
- SR-IOV - Ensure both the network adapter and the server support SR-IOV.
- VLANs - Configure at least one VLAN on the switch and specify it in the network config file.
XenServer Installation
Please download and install XenServer on the two hosts being used for certification. You should then join them in together in a pool using either the CLI or XenCenter.
If you would like to join two hosts that are not identical, or of which CPUs cannot be masked correctly – it is possible to force a pool join. This is acceptable for the operations required by the test kit and can be done by executing the following on the CLI of the pool member host:
xe pool-join master-address=<master-ip> master-username=root \
master-password=<pass> force=true
Droid VM Prepare
Create a VM template that the certification kit will use to generate test VMs (referred to as the Droid VM). The following steps show one example of preparing the Droid VM template using XenCenter. You should have access to a Windows desktop/VM with XenCenter installed.
1.To create a VM template, you should create a VM with using e.g. Rocky 8.6 or 8 latest first as below steps.
(1) Download Rocky 8.x ISO from official web site URL e.g. Rocky-x86_64-minimal.iso and put it onto the same machine of running XenCenter.
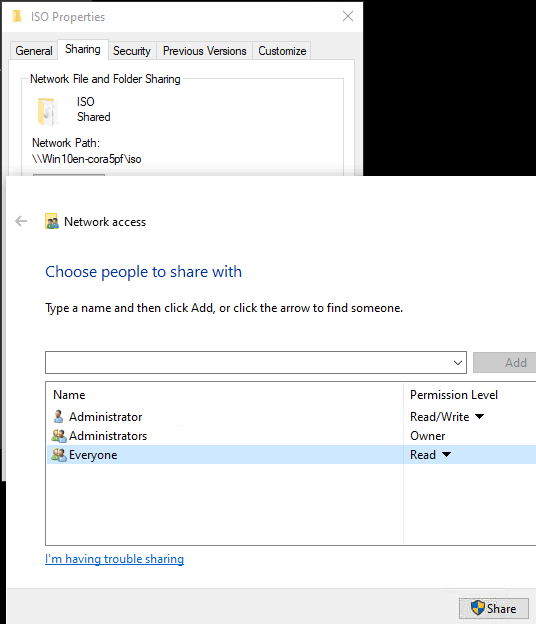
(2) On the same machine which is running XenCenter, create a share folder and put above Rocky 8 iso file in it, here as example I will save above iso file in "c:\iso" folder on the windows VM, then share this folder and add “everyone” read access. (Please make sure that your XenServer has network access to this VM which is hosting the shared storage.)
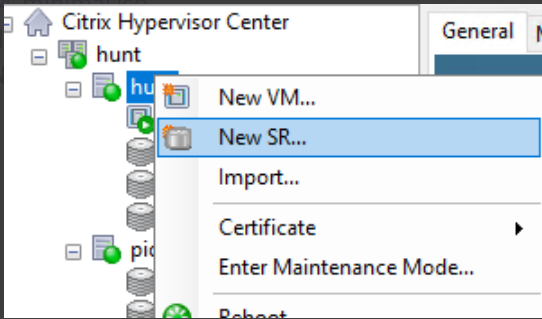
(3) Create new SR with above share folder on XenCenter, open XenCenter and add your host, right click your host then click New SR.
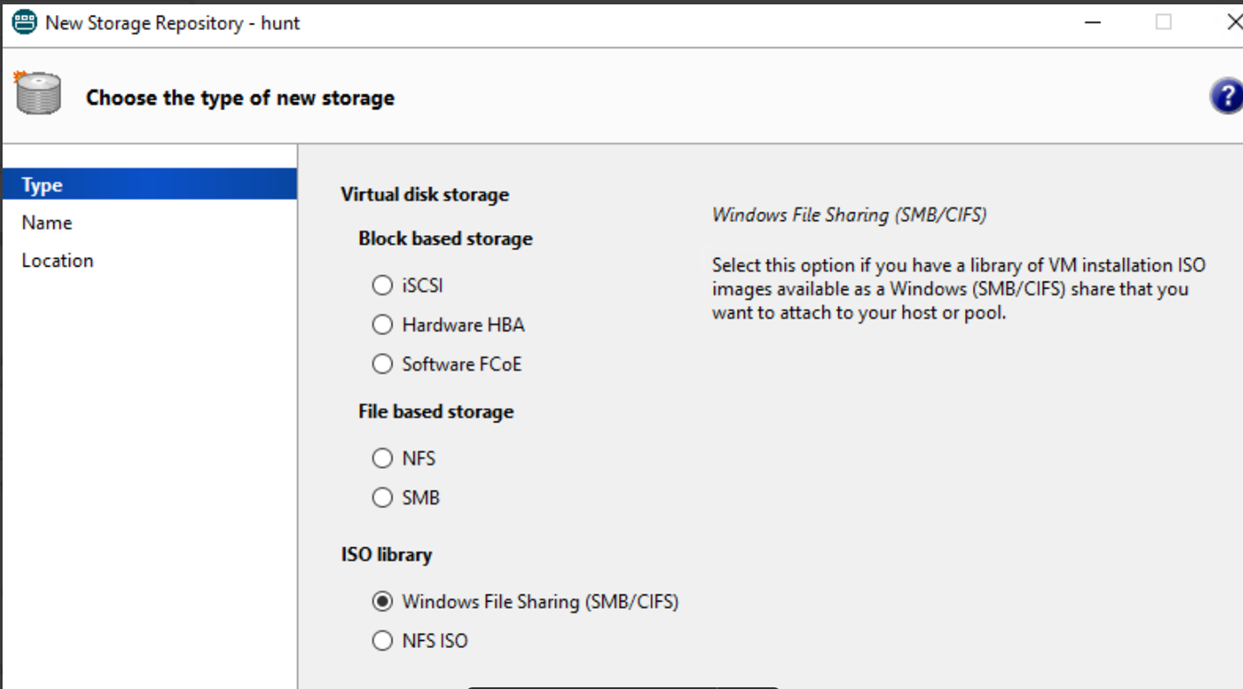
(4) Select Windows File Sharing.
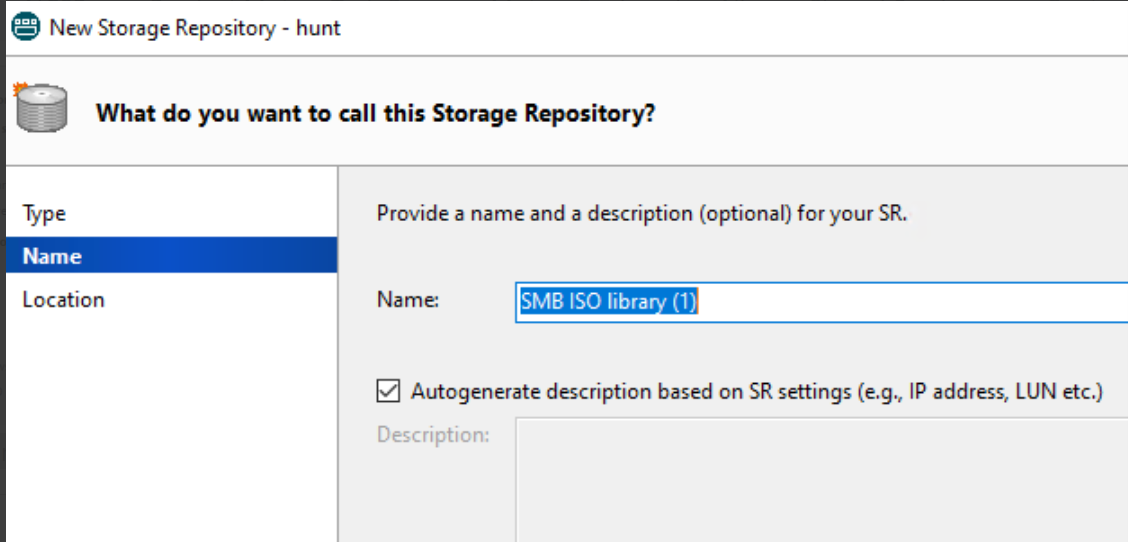
(5) Click Next and input the name, then click Next.
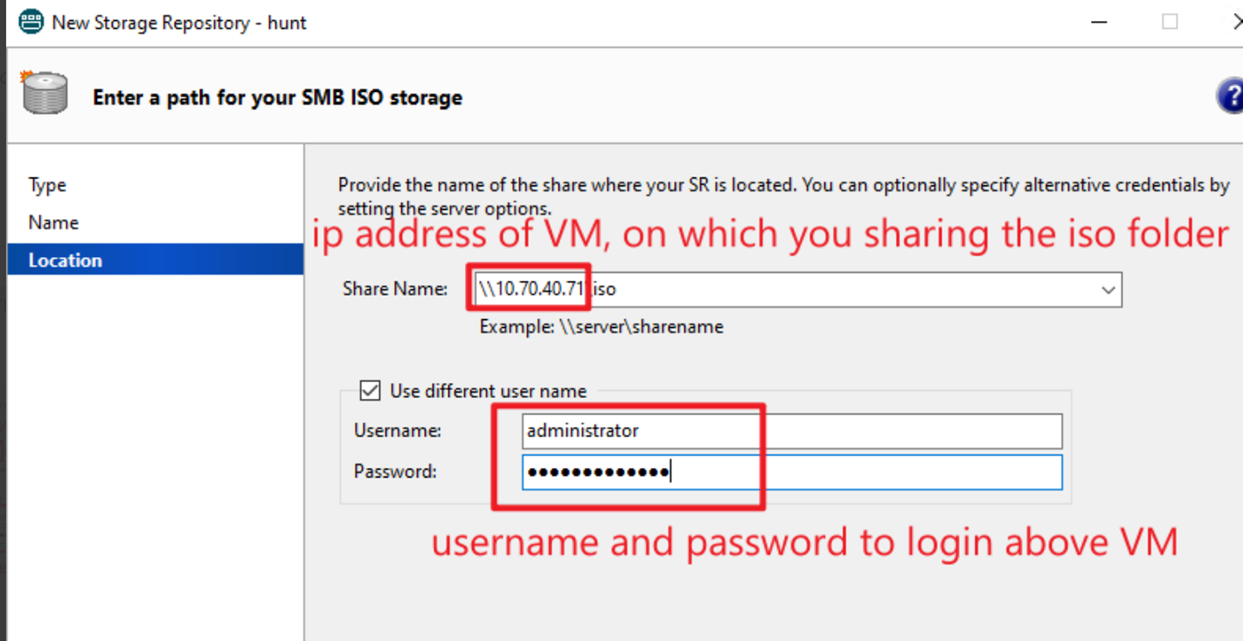
(6) Input the sharing path, username and password, then click Finish.
Note:
In share name should fill in “\\FQDN of SMB server\share folder” or “\\IP Address of SMB server\share folder”, SMB server is the VM on which you created the share folder in step 1.2, here as example, in step 1.2 I have created a share folder on windows VM(it’s IP 10.70.40.71) in “c:\iso”, this windows VM is the SMB server and share folder is ‘iso’, so in share name I fill in “\\10.70.40.71\iso”. Please refer to below screenshot.
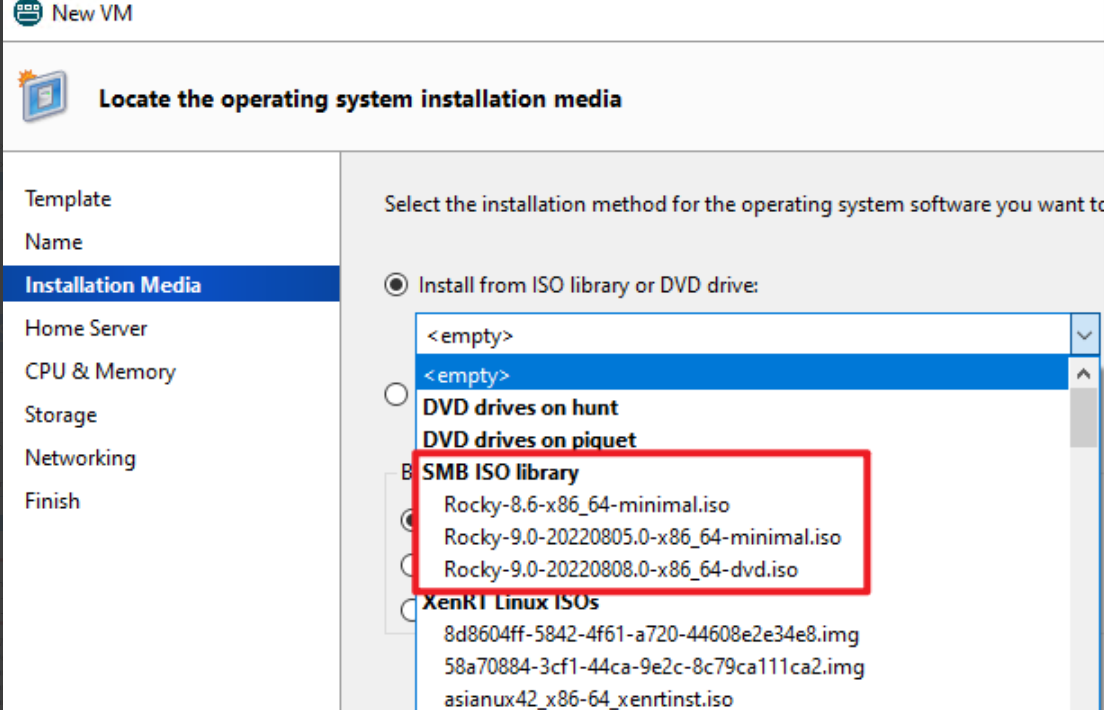
(7) Now you can create new VM in XenCenter, select Rocky Linux 8.

(8) After you created the new SR, you can select the iso file, which you save in the sharing folder.
- Memory = 4GB and Storage = 10GB is recommended.
- Please set root password = xenserver
2.After Rocky 8 Linux installed successful, please Install latest XenServer-LinuxGuestTools first.
- Download: XenServer downloads page.
- Install: Install XenServer VM Tools for Linux.
3.You can get scripts from Server Certification Kit ISO file, which can be used for setting up VM, please refer below example for getting and using those scripts.
(1) Download Server Certification Kit ISO file from HCL website and put it on Rocky 8 Linux VM in /root.
(2) Mount Server Certification Kit ISO, copy xenserver-auto-cert-kit-
# mkdir /mnt/iso
# mount -t iso9660 -o loop /root/xenserver-server-cert-kit-xs9.iso /mnt/iso/
Here as example, I used Server Certification Kit ISO version 1.3.13, so if you use another version, should replace 1.3.13-1 to your server certification kit version, you can also check the file as below screenshot and then copy this file to “/root”.

# cp /mnt/iso/Packages/xenserver-auto-cert-kit-1.3.13-1.el7.noarch.rpm /root
(3) Unpack this rpm file. Then can find VM setup scripts in “/root/opt/xensource/packages/files/auto-cert-kit/setup-scripts/”
# rpm2cpio xenserver-auto-cert-kit-1.3.13-1.el7.noarch.rpm | cpio -ivd
(4) In setup-scripts folder you can find three files as below screenshot shows.

(5) Then create folder “/root/setup-scripts” and copy all above three files to this folder.
    # mkdir /root/setup-scripts
    # cp ./opt/xensource/packages/files/auto-cert-kit/setup-scripts/*.* ./setup-scripts/

(6) Then can run commands as below to setup VM.
    # cd /root/setup-scripts/
    # sh init-run.sh
    # reboot
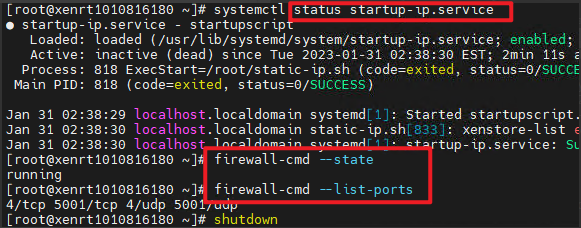
(7) After VM rebooting, service status and firewall rule should be as below..
Note:
Scripts works on Rocky 8.6, but you may encounter dependency problems on the newer Rocky 8 version, if you encounter problem as below screenshot.
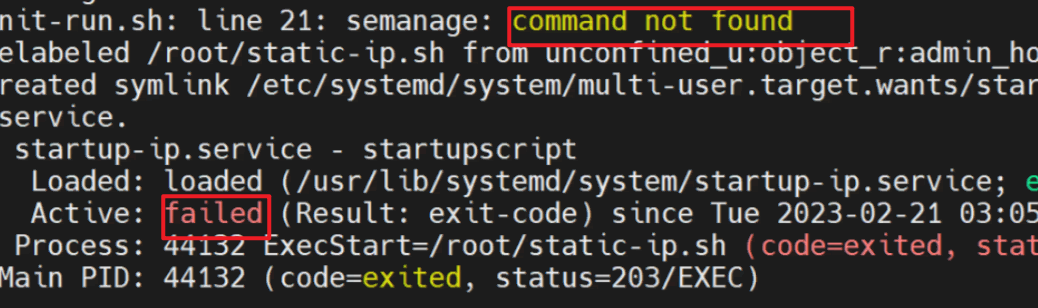
(8) We can see that can’t find command “semanage”, so need to install “semanage” by manual as below steps.
- How to install necessary packages for getting semanage command using the yum command
# yum provides /usr/sbin/semanage
- From the above sample output, you can see that we need to install policycoreutils-python-utils-2.8-16.1.el8.noarch package to use the semanage command.
# yum install policycoreutils-python-utils
- Now “semanage” command can be used, you can re-run “init-run.sh” and verify the result.
(9) Extend pm_freeze_timeout for VM
# echo 300000 > /sys/power/pm_freeze_timeout
4.When above steps done, need to export this VM as “.xva" file.
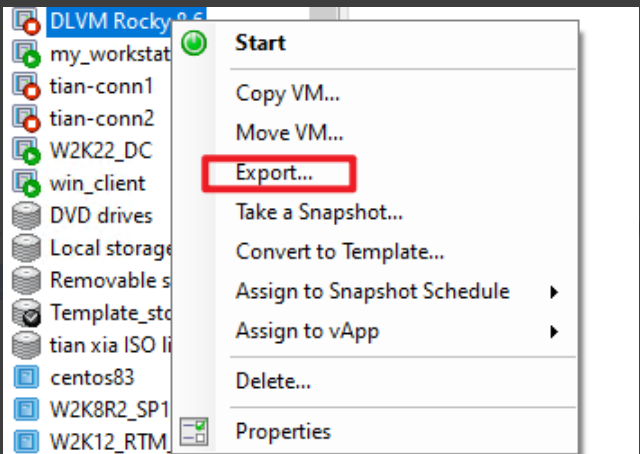
-
Shut down VM, right click VM on XenCenter and select "Export...".
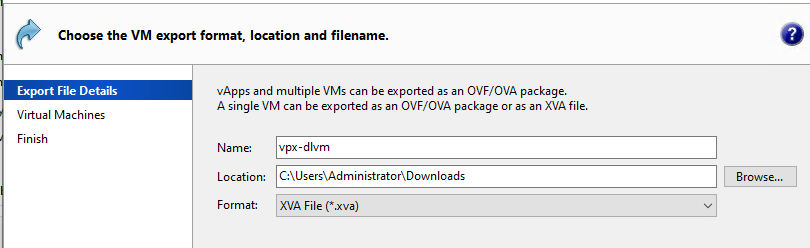
-
Input the name=vpx-dlvm, and location and select Format as "XVA file".
For the automated certification kit to run successfully, there are currently the following requirements on your XenServer deployment:
Server Certification Kit Installation
The XenServer certification kit needs to be run with the latest version of the corresponding XenServer Release. Make sure that XenServer 9 has been updated to the latest version before testing. Once the above environment has been set up, please download the xenserver-server-cert-kit-xs9.iso supplemental pack as provided by XenServer, and copy the ISO onto the /root directory of the Dom0 filesystem residing on the pool coordinator host. Use the following command to install server certification kit into all hosts in the pool:
xe update-upload file-name=/root/xenserver-server-cert-kit-xs9.iso
The command returns the update UUID of server certification kit package on successful upload.
xe update-apply uuid=<update uuid of server certification kit> --multiple
Upload "vpx-dlvm.xva” file to the server certification kit home folder on all hosts "/opt/xensource/packages/files/auto-cert-kit" .
Setting up the network configuration
The file network.conf tells the certification kit which physical interfaces it is allowed to use for testing, and how those interfaces are connected in your lab. You can refer to networkconf.example in /opt/xensource/packages/files/auto-cert-kit/ as a starting point.
The certification kit reads network.conf to decide:
- Which physical interfaces are under certification (each [ethX] section is one interface the certification kit may use).
- Which interfaces are connected to the same Layer 2 network (network_id).
Key rules (common causes of failure)
- Interfaces connected to the same Layer 2 network must share the same
network_id. network_idis a label used by the certification kit (the integer itself has no meaning beyond grouping).- For bonding tests, the certification kit requires at least two interfaces on the same
network_id.
Example topology
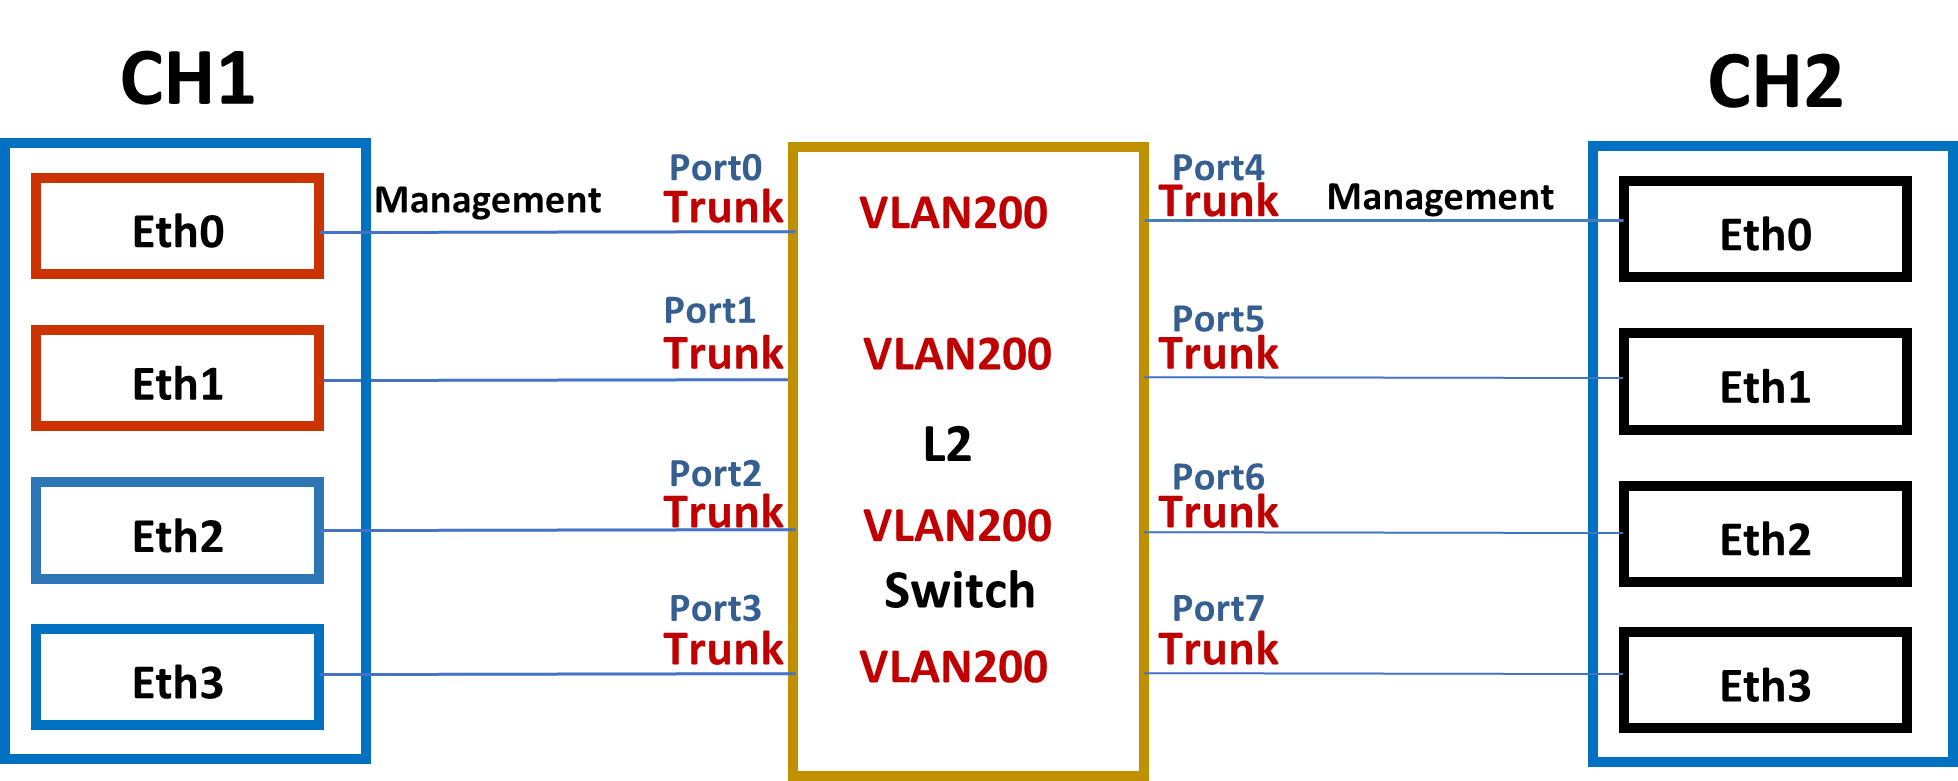
In the preceding illustration, eth0 is the management interface for both XenServer hosts (it is required that the management interface be the same on both hosts, else the certification kit will fail to execute properly).
XenServer 1 (XS1) has the hardware that is being certified, so we need to specify in our network config file the devices that can be used for testing, and their properties. In this example, eth0/eth1 and eth2/eth3 are pairs of identical cards.
Configuration options
vlan_ids: Set to0(untagged) even though you do not need VLAN testing. See Optional - VLAN configuration for VLAN testing.vf_driver_name,vf_driver_pkg,max_vf_num: Leave empty if you do not need SR-IOV testing. See Optional - SR-IOV configuration for SR-IOV testing.
DHCP-based network.conf
If DHCP is available in your lab (recommended), you only need to describe the interfaces and their Layer 2 grouping. Do not add any static_* sections.
In most DHCP-based setups, you do not need to make any changes related to the management network.
Note: The section names (e.g., [eth1], [eno3]) must match the actual network interface names on the pool coordinator host. Run xe pif-list params=device to see the interface names used by XenServer.
Minimum example (DHCP)
[eth1]
network_id = 0
vlan_ids = 0
[eth3]
network_id = 0
vlan_ids = 0
Static-IP network.conf
If DHCP is not available, you must add static_* sections in addition to the [ethX] sections.
The certification kit chooses a static IP pool based on:
- network_id (which Layer 2 network the interface is on)
- VLAN ID (0 for untagged, or a specific VLAN from vlan_ids)
Each static pool is defined as an INI section named static_<NETWORK_ID>_<VLAN_ID>.
Example:
[eth1]
network_id = 0
vlan_ids = 0
[eth3]
network_id = 0
vlan_ids = 0

[static_0_0]
ip_start = 192.168.1.2
ip_end = 192.168.1.10
netmask = 255.255.255.0
gw = 192.168.1.1
If you are using VLANs, define static_<network_id>_<vlan_id> for each VLAN that must get static IPs (see Optional - VLAN configuration).
If you need to allocate static IPs for the management network while the management interface is not under certification, append a [static_management] section.
Example (complete network.conf with static_management):
[eth1]
network_id = 0
vlan_ids = 0

[eth2]
network_id = 0
vlan_ids = 0

[static_0_0]
ip_start = 192.168.1.2
ip_end = 192.168.1.10
netmask = 255.255.255.0
gw = 192.168.1.1

[static_management]
ip_start = 192.168.0.2
ip_end = 192.168.0.10
netmask = 255.255.255.0
gw = 192.168.0.1
Optional: SR-IOV configuration
SR-IOV configuration is independent of whether you use DHCP or static IP addressing.
If you want to certify SR-IOV, add the following keys under each interface section in network.conf:
vf_driver_name: VF driver module name to be used by the Droid VM. If specified, the certification kit writes the value to/etc/modules-load.d/<name>.confin the Droid VM so the driver loads automatically during boot. Leave empty if the VF driver is already built into the kernel or loads automatically.vf_driver_pkg: VF driver RPM package name. The RPM must exist under/opt/xensource/packages/files/auto-cert-kit/on the pool coordinator host. If specified, the certification kit uploads and installs the package in the Droid VM. Leave empty if the driver is already installed in the Droid VM.max_vf_num: (Optional) Maximum number of VFs to test per PF. Must be greater than 1 if specified. If not specified, the certification kit tests all available VFs.
Example:
[eth0]
network_id = 0
vlan_ids = 0
vf_driver_name = ixgbevf
vf_driver_pkg = kmod-ixgbevf-2.16.1-1.el7.elrepo.x86_64.rpm
max_vf_num = 8
Note:
The Droid VM used by server certification kits is /opt/xensource/packages/files/auto-cert-kit/vpx-dlvm.xva, which is based on upstream Rocky 8.6 or 8 latest. The specified .rpm package must be applicable to the Droid VM in use.
Optional: VLAN configuration
VLAN configuration is independent of whether you use DHCP or static IP addressing.
Note: VLAN tests are not included in the default test set. To run VLAN tests, add the
-vargument when executing the certification kit.
If you want to certify VLAN, add vlan_ids under each interface section in network.conf:
vlan_ids: VLAN ID(s) used for VLAN-related testing. Use a comma to separate multiple VLAN IDs.
If you are using static IP addressing, define static_<network_id>_<vlan_id> for each VLAN that must get static IPs.
Example (DHCP):
[eth0]
network_id = 0
vlan_ids = 200
Example (Static IP):
[eth0]
network_id = 0
vlan_ids = 200

[static_0_200]
ip_start = 192.168.200.2
ip_end = 192.168.200.10
netmask = 255.255.255.0
gw = 192.168.200.1
Server Certification Kit Operation
Running the certification tests
To run the certification tests, please run the following commands:
cd /opt/xensource/packages/files/auto-cert-kit
./ack_cli.py [options]
Unless specified otherwise, the test kit will attempt to execute all of its tests (network, local storage, CPU and operational). For network adaptor certification, only the network tests are a requirement for certification, though it is advisable for the complete test kit to have been run.
For any of the options the user is required to specify a network configuration (ini format) file on the command line:
./ack_cli.py -n network.conf
There is an example file located in the server certification kit's root directory (networkconf.example). The purpose of this file is to show all available configuration items for both network interfaces and static IP addressing. You can refer to Setting up the network configuration to learn how to construct network.conf file.
Once executed, the server certification kit will then generate and execute a list of tests for each device on the pool coordinator host that should be certified.
You can also run the certification kit in debug mode, with the argument -d. This will cause the certification kit to exit on exception, rather than continue to run the remaining tests.
Querying the status of the test run
Depending on the set of tests being executed by the certification kit, a host reboot may be required. This means that unless you are executing the certification kit from the host's physical console you will no longer see the progress of the certification kit after the reboot. If this happens, then you can follow the logs being generated at /var/log/auto-cert-kit.log, however you can also query the test kit status by running the status.py module (located in the server certification kit install directory).
The module will return one of the following results:
0:Finished (Passed:[num] Failed:[num] Skipped:[num])
1:Process not running. An error has occurred. (Passed:[num],
Failed:[num], Skipped:[num], Waiting:[num], Running:[num])
2:Running - [num]% complete (Passed:[num], Failed:[num], Skipped:[num],
Waiting:[num], Running:[num])
3:Server rebooting... (Passed:[num], Failed:[num], Skipped:[num],
Waiting:[num], Running:[num])
4:Manifest file has not been created. Have run the certification kit? (Has an error
occured?)
5:An error has occured reading. [testfile]
Current Known Limitations
XenServer is aware of the following limitations in the server certification kit at present:
- SR-IOV tests in server certification kit are able to test the maximum VFs per single port/PF, but not all ports/PFs combined if the network adapter has multiple ports.
Submitting results and logs to Citrix
After a test run has been completed, there should be two files created in the /root/ directory on the pool coordinator host:
- ack-submission-[time]-[date].tar.gz
- results.txt
The results.txt file will detail the output of your test run, specifying which tests have passed or failed, along with the features marked as supported for your device.
More specific result information and test exceptions can be found in the XML file generated after each run:
/opt/xensource/packages/files/auto-cert-kit/test_run.conf
Debug logging is currently printed to stdout, as well as the server certification kit's log file which is found in /var/log/auto-cert-kit.log. This log file is collected automatically as part of a XenServer status report (which is required for submission).
We would obviously appreciate it if vendors could submit log/result files so that we can establish we are collecting the appropriate information concerning your devices, as well as fix any bugs that you may have found during the testing performed on your hardware.
The mechanism for providing us with these files and feedback are via the XenServer ticket tracker. Please see instructions below for creating a new ticket.
In the normal case where the test kit runs to completion, we would ask that the vendor submits the ack-submission package:
- /root/ack-submission-[time]-[date].tar.gz
- xenserver-server-certification-form
However, if there is a failure such that the ack-submission package is not created, then we would ask that you submit the following:
- Server Status Report - this can be obtained by either running the ‘xen-bugtool -y’ command on the coordinator host, or by using XenCenter (Tools - Get Server Status Report).
- The network.conf and test_run.conf file mentioned in the section above.
Bug Reports and Feedback
In order for us to collect your feedback on this kit, and improve it for subsequent releases, we would ask that you submit either certifications or bugs on our issue tracking system, ‘tracker’.
1.Tracker can be found here - https://xenserver-tracker.atlassian.net/ 2.If your company already has a project open on this system with XenServer, then please raise your issues here. If however, you do not have a specific project for your company, please raise your issues under the XenServer Hardware Compatibility List (HCL) project. 3.You can create an issue by click Create on the top menu.

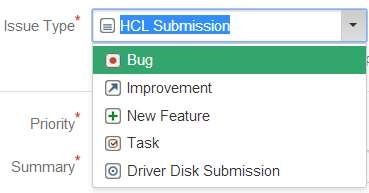
4.Select the issue type as HCL Submission if you are looking to certify your hardware on HCL. Similarly the issue type needs to be of the type Driver Disk Submission in case for Driver Disks and likewise others.
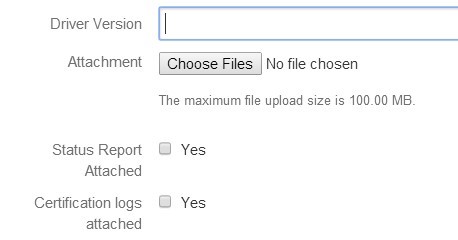
5.Fill in the details and attach the necessary logs that are required for certification. Driver Version needs to be filled only if your Issue type is of Driver Disk Submission else leave it blank.
6.Enter the name of your tested product name in Device Tested field that matches to the exact way it needs to be updated on HCL.

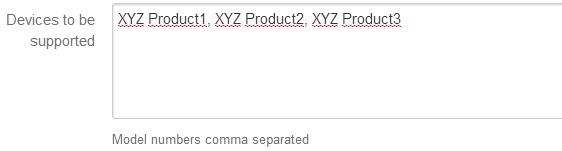
7.You can also have your equivalent devices certified based on the Device Tested product which can be listed in Device to be supported field separated by commas.
8.Enter a description of your product which you would like to highlight the reviewer.

9.That’s it. You can check on Create another before you hitting the Create in case you want to add more products for certification. Please note that you need to raise only one ticket per product even though you might be testing different interconnects say iSCSI, FC, and so on for a storage controller.

10.The progress of your ticket can be tracked by clicking on My Unresolved Reported Issues on top left corner of your Dashboard.
11.We thank you for the submission made and can usually respond you within 2-3 days. In case of emergencies, you can up the priority which should be used with care.
Troubleshoot
This section is designed to capture some of the common issues faced by vendors running the certification kit. Our hope is that in time, we will be able to improve the certification kit to help users avoid the problems being faced, but most of the issues we see are linked to environmental factors. If you are encountering an issue with the certification kit, please take a look at the following failures and their steps for resolution.
My VLAN test network_tests.VLANTestClass.test_vlan_high_port failed.
Please validate the VLAN ID you configured in your network.conf file. The specified VLAN ID (say [200]) should be already configured on the switch. The switch needs to allow XenServer to tag the packets and for it to pass them onwards to the appropriate ports. Make sure the VLAN ID is configured on the switch for all the ports being used by the servers under test.
My MTU test network_tests.MTUPingTestClass.test_ping fails.
This test is to verify whether or not your NICs can support Jumbo frames. If you know your NIC to already support Jumbo frames, then the most likely cause for failure is simply because your switch has not yet been configured for Jumbo frames. Please check this with your respective IT to get the switch configured properly.
If you believe you have configured the switch appropriately, then please also validate manually that Jumbo frames can be passed through the device under test, and attach the logs in your submission.
My Multicast test network_tests.MulticastTestClass fails.
This test is to verify whether your NICs support Multicast feature, and it’s optional, so you can ignore the test result if you don’t want to certify the feature. If you encounter the test is failed, one possible reason is that other network device, like a switch or a router, in your test environment does not support Multicast.
My SR-IOV test network_tests.InterHostSRIOVTestClass, IntraHostSRIOVTestClass1, or IntraHostSRIOVTestClass2 fails?
This test is to verify whether your NICs can support SR-IOV feature, and it’s optional, so you can ignore the test result if you don’t want to certify the feature. There could be multiple factors that would cause the failure. Use the checklist below to identify the real cause.
- Whether the server (including CPU, BIOS, firmware, and PCI bus) supports SR-IOV?
- Whether correct network adapter driver (for PF) has been installed in XenServer?
- Whether correct VF driver is specified in network.conf, and RPM file is already uploaded to folder /opt/xensource/packages/files/auto-cert-kit/ of pool coordinator host?
- Whether the VF driver is applicable to the Droid VM used by server certification kit? If you are not sure whether the driver is applicable, you can import Droid VM into XenServer, start it, install VF driver manually and perform manual verification test at first before running server certification kit. Below is command to import Droid VM:
  # cd /opt/xensource/packages/files/auto-cert-kit/
  # xe vm-import filename=vpx-dlvm.xva
- Whether there is sufficient memory and IP addresses available in your test environment? This is concerned because IntraHostSRIOVTestClass2 for SR-IOV will tests the maximum VFs support of one PF.
With an example, assume the maximum VFs is 63, which means server certification kit will create 11 Droid VMs and pass through all the 63 VFs to them evenly. It’s calculable that 11GB memories and 74 (63 VF interfaces + 11 management interfaces) IP addresses are required.
Due to hardware limitations or other reasons, you may not want to test so many VFs even if your NIC supports it. In this case, you are able to specify the maximum VFs to test using key max_vf_num. In the following example, server certification kit will test only 16 VFs instead of original maximum.
  [eth0]
  network_id = 0
  vlan_ids = 200
  vf_driver_name = ixgbevf
  vf_driver_pkg = kmod-ixgbevf-2.16.1-1.el7.elrepo.x86_64.rpm
  max_vf_num = 16
Few tests have failed. I don’t want to run the full kit all over again. Is there a way to run just these failed tests?
We provide the following two methods to customize your re-run:
Method 1:
Run a specific category of tests. Your tests are categorized into several groups. You can select to run just one of these groups with an additional argument “-m <TAG>”. Please refer to the following table for relevant tags.
./ack_cli.py -n network.conf -m <Tag>
| Category | Tag |
|---|---|
| Network Tests | NET |
| Operation Tests | OPS |
| CPU Tests | CPU |
| Local Storage /IOZone Test | LSTOR |
| All tests (default) | ALL |
Method 2:
Run a specific test class. You can specify any test classes you want to run with an additional argument ‘-o “run_classes=<TEST CLASS LIST>”’, where <TEST CLASS LIST> is a list of test classes with space as delimiter, and test class is in format of “<module name>.<class name>”. All module and class names are available in file result.txt.
Examples:
1.Run only Crash Dump test class
   # ./ack_cli.py -n network.conf -o \
   "run_classes=operations_tests.CrashDumpTestClass"
2.Run only Multicast test class
   # ./ack_cli.py -n network.conf -o \
   "run_classes=network_tests.MulticastTestClass"
3.Run only all SR-IOV test classes
   # ./ack_cli.py -n network.conf -o \
   "run_classes=network_tests.InterHostSRIOVTestClass \
   network_tests.IntraHostSRIOVTestClass1 \
   network_tests.IntraHostSRIOVTestClass2"
4.Run any test classes you want like below showing
   # ./ack_cli.py -n network.conf -o \
   "run_classes=network_tests.MulticastTestClass \
   network_tests.IntraHostSRIOVTestClass2 \
   operations_tests.CrashDumpTestClass"
Notice and Disclaimer
The contents of this kit are subject to change without notice.
Copyright © 2026 Cloud Software Group Inc. This kit allows you to test your products for compatibility with XenServer products. Actual compatibility results may vary. The kit is not designed to test for all compatibility scenarios. Should you use the kit, you must not misrepresent the nature of the results to third parties. TO THE EXTENT PERMITTED BY APPLICABLE LAW, XENSERVER MAKES AND YOU RECEIVE NO WARRANTIES OR CONDITIONS, EXPRESS, IMPLIED, STATUTORY OR OTHERWISE, AND XENSERVER SPECIFICALLY DISCLAIMS WITH RESPECT TO THE KIT ANY CONDITIONS OF QUALITY, AVAILABILITY, RELIABILITY, BUGS OR ERRORS, AND ANY IMPLIED WARRANTIES, INCLUDING, WITHOUT LIMITATION, ANY WARRANTY OF MERCHANTABILITY OR FITNESS FOR A PARTICULAR PURPOSE. YOU ASSUME THE RESPONSIBILITY FOR ANY INVESTMENTS MADE OR COSTS INCURRED TO ACHIEVE YOUR INTENDED RESULTS. TO THE EXTENT PERMITTED BY APPLICABLE LAW, XENSERVER SHALL NOT BE LIABLE FOR ANY DIRECT, INDIRECT, SPECIAL, CONSEQUENTIAL, INCIDENTAL, PUNITIVE OR OTHER DAMAGES (INCLUDING, WITHOUT LIMITATION, DAMAGES FOR LOSS OF INCOME, LOSS OF OPPORTUNITY, LOST PROFITS OR ANY OTHER DAMAGES), HOWEVER CAUSED AND ON ANY THEORY OF LIABILITY, AND WHETHER OR NOT FOR NEGLIGENCE OR OTHERWISE, AND WHETHER OR NOT XENSERVER HAS BEEN ADVISED OF THE POSSIBILITY OF SUCH DAMAGES.