
XenServer 9 GPU Certification Kit Guide
DownloadPublished July 2026
V9.0.0 Edition
Table of contents
- Introduction
- Prerequisites
- Test environment setup
- Certifying GPU pass-through
- Certifying vGPU
- Submit test results
Introduction
This kit includes certification tests for XenServer GPU pass-through and tests for XenServer vGPU (for details on vGPU, please refer to section Certifying vGPU). This certification kit allows vendors to test a GPU (or multiple GPUs) in a given hardware platform, perform a basic set of compatibility tests, and return the results to XenServer for inclusion on the XenServer GPU Hardware Compatibility List (HCL): https://hcl.xenserver.com/.
This test consists of four steps:
- Set up a XenServer host with one or more GPUs installed
- Prepare the Virtual Desktop inside a virtual machine
- Set up XenServer VMs with GPU pass-through and vGPU
- Run the GPU tests
The XenServer certification kit must be run with the latest version of the corresponding XenServer release. Ensure that you update XenServer 9 to the latest version before testing.
The tests must be completed with the maximum number of physical GPU cards that you wish to certify present. Report all test results in the xenserver-gpu-certification-form.docx. Each test case execution must be documented by the vendor as passed, failed, or other. Possible reasons for documenting "other" include: not tested justification, does not apply (for example, the vendor does not support functionality).
For each test, the vendor is asked to provide details that help XenServer understand the circumstances under which the test was done and the results achieved, for example, specific settings, software versions used.
The test results remain confidential and are intended only for mutual use by the vendor and XenServer. XenServer does not share, publish, or otherwise distribute test reports to any other party without prior written consent from the vendor. Fields detailing marketing information - for example, "Product Name" - might be published.
Prerequisites
- The server that is being certified for GPU must already be present on the XenServer HCL (https://hcl.xenserver.com/). OEM users can download the server hardware certification kit from the XenServer HCL website: https://hcl.xenserver.com/certkits/. For non-OEM users, refer to the hardware manufacturer's information.
- Ensure that the graphics card manufacturer supports the use of their hardware in the chosen server.
- For Citrix Virtual Apps and Desktops, you require access to an account on an Active Directory (AD) domain controller to be able to attach your VM to AD.
Test environment setup
Install XenServer
- Download XenServer from https://www.xenserver.com/downloads.
- Install XenServer on a single host. For more information, see https://docs.xenserver.com/en-us/xenserver/9/install.
- If you are performing a vGPU test, after installing XenServer, install the GPU host driver on XenServer. Download the GPU host driver from the vendor's official website and install it on your XenServer host. For more information, see https://docs.xenserver.com/en-us/xenserver/9/graphics/hv-graphics-config.
- Install XenCenter on a client Windows machine. For more information, see https://docs.xenserver.com/en-us/xencenter/current-release/install-xencenter.
- Update XenServer to the latest version. For more information, see https://docs.xenserver.com/en-us/xenserver/9/update/apply-updates-using-xc.
-
Verify that IOMMU is enabled on the host by executing the following xe commands on the XenServer console:
xe host-list (returns the host_id)
xe host-param-get param-name=chipset-info param-key=iommu uuid=<host_id>
If executing the above command does not return "true", reboot the host and enable the option in the BIOS.
-
When using NVIDIA vGPU with XenServer servers that have more than 768 GB of RAM, add the parameter iommu=dom0-passthrough to the Xen command line by running the following command in the control domain (Dom0):
/opt/xensource/libexec/xen-cmdline --set-xen iommu=dom0-passthrough -
Restart the host.
Prepare a Windows VM
- You can run this certification kit on only one of the supported Windows guest operating systems. (You do not need to verify on every supported Windows operating system). The list of supported operating systems is available here: https://docs.xenserver.com/en-us/xenserver/9/graphics.html. The examples below are based on Windows 11 24H2 (build 26100).
- The Citrix Virtual Apps and Desktops connection can be tested on only one of the supported operating systems. RDP or VNC can be used for the other tests depending on their availability.
-
If hardware constraints allow, you can run the tests for each feature concurrently.
-
Build a Windows VM and install XenServer VM Tools onto the Windows VM. For more information, see https://docs.xenserver.com/en-us/xenserver/9/vms/windows.html.
Note:
To simplify multi-vGPU testing, you can use a template or copy the VM to create multiple instances.
-
Enable Remote Desktop on the VM.
Set up a Windows VM
GPU tests also can be done through the virtual desktop. Choose one of the following options for doing the GPU tests with a virtual desktop:
-
Option 1: Through Citrix Virtual Apps and Desktops
You can connect to and control the tested Windows VM through a Citrix Virtual Apps and Desktops session. If your test environment already has Citrix Virtual Apps and Desktops deployed, this is the recommended option. To set up Citrix Virtual Apps and Desktops, see the official Citrix documentation: https://docs.citrix.com/en-us/citrix-virtual-apps-desktops/install-configure.html.
-
Option 2: Through Sunshine and Moonlight
Sunshine (host) and Moonlight (client) are community, open-source tools that stream a GPU-rendered desktop session. If you do not already have Citrix Virtual Apps and Desktops, use this option to set up a test environment quickly. A headless passed-through GPU also needs a display to render to (not required for a vGPU, which provides its own virtual display); see Set up a display for the passed-through GPU.
1) On the Windows VM (host), install Sunshine from https://github.com/LizardByte/Sunshine/releases:
- Run the Windows installer. The ViGEmBus (virtual gamepad) prompt can be skipped; it is not required for the tests.
- Open the Sunshine web UI at
https://<vm-ip>:47990(use https), and set a username and password on first launch. - In Configuration → Audio/Video, leave Adapter Name and Display Id blank so that Sunshine automatically selects the GPU and the primary (Virtual Display Driver) display.
2) On your client workstation, install Moonlight from https://github.com/moonlight-stream/moonlight-qt/releases:
- Select Add PC and enter the VM's IP address.
- Pair the client: Moonlight shows a 4-digit PIN; enter that PIN on the Sunshine web UI PIN page.
- Open the Desktop app to reach the GPU-rendered session.
-
Option 3: Through Remote Desktop Protocol (RDP)
Microsoft Remote Desktop can be used to connect to and control the tested VM from a remote client. Ensure that Remote Desktop is enabled on the tested Windows VM. For Windows 11 VMs, refer to the following link to configure Microsoft's RDP: https://learn.microsoft.com/en-us/windows-server/remote/remote-desktop-services/clients/remote-desktop-allow-access
For other Windows operating systems, you can search for similar guides from Microsoft.
Note: Use Option 1 or Option 2 for the GPU rendering tests (WinSAT, Unigine Tropics); RDP (Option 3) is suitable only for setup and the crash-and-recovery test.
Install the benchmark tools
Install these tools on the Windows VM prepared above; they are used later by the Unigine Tropics benchmark (Test the Windows VM benchmark).
-
Install .NET Framework 3.5 (required by Unigine Tropics). It is the optional Windows feature
NetFx3. Mount the Windows ISO that matches the guest, then enable it from itssources\sxsfolder (replaceD:with the mounted ISO drive letter):DISM /Online /Enable-Feature /FeatureName:NetFx3 /All /LimitAccess /Source:D:\sources\sxsOn Windows Server, run
Install-WindowsFeature NET-Framework-Core -Source D:\sources\sxsinstead. Verify with:Get-ChildItem "HKLM:\SOFTWARE\Microsoft\NET Framework Setup\NDP" | Select-Object PSChildNameThe output must include
v2.0.50727,v3.0, andv3.5. -
Download PHP 8.1 (x64, Non-Thread-Safe) from the archives at https://windows.php.net/downloads/releases/archives/ (for example
php-8.1.34-nts-Win32-vs16-x64.zip) and unzip it intoC:\php.Note: Use PHP 8.1, not the latest release. Phoronix Test Suite 10.8.4 is not compatible with PHP 8.2 or later, which stops it from resolving and installing tests.
-
If required, install the Microsoft Visual C++ redistributable from https://docs.microsoft.com/en-us/cpp/windows/latest-supported-vc-redist.
-
Download Phoronix Test Suite 10.8.4 from https://github.com/phoronix-test-suite/phoronix-test-suite/releases/tag/v10.8.4 (the Source code (zip) archive). It unzips to a
phoronix-test-suite-10.8.4folder; put its contents inC:\phoronix-test-suiteso thatphoronix-test-suite.batsits directly underC:\phoronix-test-suite. -
In an elevated Command Prompt, install the Tropics benchmark:
C: CD C:\phoronix-test-suite Set PHP_BIN=C:\php\php.exe phoronix-test-suite install pts/unigine-tropics -
Installing the test only downloads the Tropics installer; run it so the application appears in the Start menu. Double-click the MSI at:
%USERPROFILE%\.phoronix-test-suite\installed-tests\pts\unigine-tropics-<version>\Unigine_Tropics-*.msi(The version folder and MSI name vary by environment. You might need to click OK to install the OpenAL drivers during setup.)
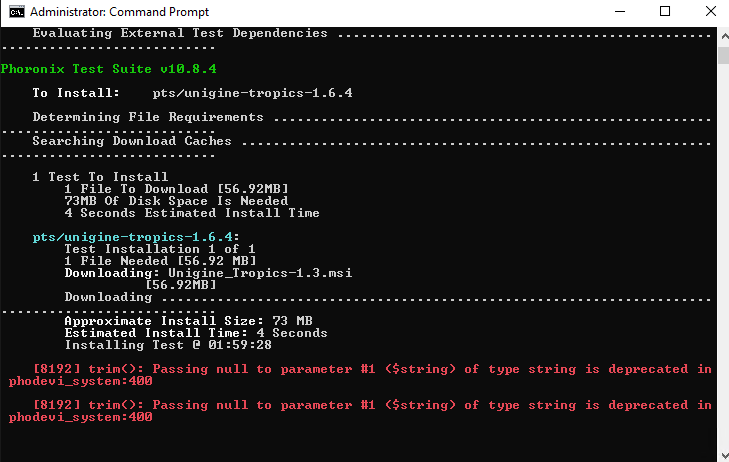
Note: Benchmark testing with Tropics is not applicable to all lower-end graphics cards, as Tropics can require too much video memory (minimum 256 MB). If the test fails because of these limits, provide a screenshot and an explanation as part of your submission.
Prepare a Linux VM
- This certification kit can run on Linux guests to certify GPU pass-through for Linux support on XenServer 9 and later.
- Choose one of the supported Linux operating systems. For the latest release, see: https://docs.xenserver.com/en-us/xenserver/9/graphics.html. We recommend that you use Ubuntu 22.04 or Rocky 9.x for a non-Ubuntu Linux VM.
- Use VNC and SSH for communication between your workstation and Linux VMs. You can also use Citrix Linux Virtual Agent if it supports your choice of Linux distribution and graphics card. (https://www.citrix.com/downloads/citrix-virtual-apps-and-desktops)
- Both server editions and desktop editions of Linux distributions are usable for this certification. Desktop editions might require less set up.
- If hardware constraints allow, the following two tests can be run concurrently.
GPU pass-through certification for Linux guests is optional. The examples below use Ubuntu Desktop 22.04 and Rocky Linux 9.7.
Set up an Ubuntu Linux VM
-
Create a supported Ubuntu VM with at least 4 GB of RAM and 50 GB of storage.
Note:
- Do not assign the GPU during Linux installation.
- To avoid the kernel-module signing step, you can leave UEFI Secure Boot disabled. To certify with Secure Boot enabled, sign the NVIDIA module with a MOK and enroll it (re-sign after each driver or kernel update); see https://docs.xenserver.com/en-us/xenserver/9/vms/linux.html#install-third-party-drivers-on-your-secure-boot-linux-vm.
1) Ensure the VM is connected to the internet.
2) Install your Linux distribution by following the installer. Either the server or desktop edition can be used. These tests are not applicable to other flavors such as Kubuntu, Xubuntu, Lubuntu, or Ubuntu-GNOME.
3) Install XenServer VM Tools for Linux (https://docs.xenserver.com/en-us/xenserver/9/vms/linux.html#install-xenserver-vm-tools-for-linux).
4) In XenCenter, open the Console tab of the VM.
5) (Desktop edition only) Do not run the Software Updater tool. If it appears automatically, dismiss it.
6) (Desktop edition only) Open a terminal.
-
Configure remote access.
1) Install an SSH server so you can connect to the VM with an SSH session:
sudo apt-get install -y openssh-server2) Create a user and enable GDM auto-login with Xorg (x11vnc needs a logged-in Xorg session; GDM will not auto-login
root). Replacetesterwith your account:sudo useradd -m tester && sudo passwd tester printf '%s\n' '[daemon]' 'WaylandEnable=false' 'AutomaticLoginEnable=true' 'AutomaticLogin=tester' | sudo tee /etc/gdm3/custom.conf3) Install and configure x11vnc, and open the firewall:
sudo apt-get install -y x11vnc
sudo x11vnc -storepasswd && sudo mv /root/.vnc/passwd /etc/x11vnc.pass
U=$(id -u tester)
printf '%s\n' '[Unit]' 'Description=Start x11vnc at startup.' 'After=display-manager.service' '[Service]' 'Type=simple' "ExecStart=/usr/bin/x11vnc -display :0 -auth /run/user/$U/gdm/Xauthority -forever -loop -noxdamage -repeat -rfbauth /etc/x11vnc.pass -rfbport 5900 -shared -noshm -o /var/log/x11vnc.log" '[Install]' 'WantedBy=multi-user.target' | sudo tee /lib/systemd/system/x11vnc.service
sudo systemctl daemon-reload && sudo systemctl enable x11vnc
sudo ufw allow 5900
Note: x11vnc attaches only to an Xorg session, not Wayland, which is why
WaylandEnable=falseis set above. It is also effectively unmaintained upstream; on Ubuntu 24.04 or later, considergnome-remote-desktopor the Sunshine/Moonlight path instead.4) Verify x11vnc. The service is enabled to start at boot; it runs once
testeris auto-logged in to an Xorg :0 desktop (after the next reboot). Confirm it is enabled now, and after that reboot confirm it is running and listening on port 5900:systemctl is-enabled x11vnc # after a reboot into the graphical desktop (x11vnc does not listen in text mode): systemctl status x11vnc sudo ss -ltnp | grep 5900 -
Install Phoronix and the benchmark tests.
1) Install the Phoronix Test Suite from source, then let
install-dependenciesinstall the per-distribution test dependencies. Enable the i386 architecture first (Unigine Tropics is a 32-bit binary);install-dependenciesinstalls system packages, so run it withsudo:sudo dpkg --add-architecture i386 sudo apt-get update sudo apt-get install -y php-cli php-xml php-gd php-curl git git clone https://github.com/phoronix-test-suite/phoronix-test-suite.git cd phoronix-test-suite sudo ./install-sh phoronix-test-suite version sudo phoronix-test-suite install-dependencies pts/x264-1.9.0 pts/x264-opencl pts/unigine-tropics2) In a
testershell (SSHsu - testeris fine for install; the graphical Unigine Tropics test is installed and run later inside the VNC session), install the benchmarks. Usepts/x264-1.9.0, because the newer x264 profiles' Bosphorus video source is no longer available:Note:
These steps might take a while. You must agree to the terms of the Phoronix Test Suite, but anonymous statistics reporting is not mandatory.
If an OpenCL dependency regarding opencl-headers is reported when you install
pts/x264-opencl, ignore the warning and continue the installation. It is already manually installed.phoronix-test-suite install pts/x264-1.9.0 pts/x264-opencl3) If
pts/x264-1.9.0orpts/x264-openclfail to build with a PIE relocation error, patch the configure call and reinstall:sed -i 's#\./configure #./configure --extra-cflags="-fno-PIE" --extra-ldflags="-no-pie" #' ~/.phoronix-test-suite/test-profiles/pts/x264-1.9.0/install.sh sed -i 's#\./configure #./configure --extra-cflags="-fno-PIE" --extra-ldflags="-no-pie" #' ~/.phoronix-test-suite/test-profiles/pts/x264-opencl-1.9.1/install.sh phoronix-test-suite install pts/x264-1.9.0 pts/x264-opencl
Set up a Non-Ubuntu Linux VM
These steps are for RHEL-family distributions (Rocky Linux / RHEL / AlmaLinux 9), validated on Rocky Linux 9.7.
-
Create a supported Rocky Linux VM with at least 4 GB of RAM and 50 GB of storage.
Note:
- Do not assign the GPU during Linux installation.
- To avoid the kernel-module signing step, you can leave UEFI Secure Boot disabled. To certify with Secure Boot enabled, sign the NVIDIA module with a MOK and enroll it (re-sign after each driver or kernel update); see https://docs.xenserver.com/en-us/xenserver/9/vms/linux.html#install-third-party-drivers-on-your-secure-boot-linux-vm.
- Do not run
dnf update. It would move the VM to a newer point release and break the match with the driver and the pinnedkernel-devel/kernel-headers.
1) Ensure the VM is connected to the internet.
2) Install your Linux distribution by following the installer through to completion. Any flavor, server or desktop, can be used; a desktop edition may be less effort to set up but is not mandatory. This example was tested with Rocky Linux 9.7 Desktop (GNOME) with all add-ons selected.
3) Install XenServer VM Tools for Linux (https://docs.xenserver.com/en-us/xenserver/9/vms/linux.html#install-xenserver-vm-tools-for-linux).
4) In XenCenter, open the Console tab of the VM.
5) Open a terminal.
-
Configure remote access.
1) Create a user and enable GDM auto-login with Xorg (x11vnc needs a logged-in Xorg session; GDM will not auto-login
root). On RHEL-family the file is/etc/gdm/custom.conf(notgdm3). Replacetesterwith your account:sudo useradd -m tester && sudo passwd tester printf '%s\n' '[daemon]' 'WaylandEnable=false' 'AutomaticLoginEnable=true' 'AutomaticLogin=tester' | sudo tee /etc/gdm/custom.conf2) Install and configure x11vnc (from EPEL), and open the firewall (RHEL-family uses firewalld, not ufw):
sudo dnf install -y epel-release
sudo dnf install -y x11vnc
sudo x11vnc -storepasswd && sudo mv /root/.vnc/passwd /etc/x11vnc.pass
U=$(id -u tester)
printf '%s\n' '[Unit]' 'Description=Start x11vnc at startup.' 'After=display-manager.service' '[Service]' 'Type=simple' "ExecStart=/usr/bin/x11vnc -display :0 -auth /run/user/$U/gdm/Xauthority -forever -loop -noxdamage -repeat -rfbauth /etc/x11vnc.pass -rfbport 5900 -shared -noshm -o /var/log/x11vnc.log" '[Install]' 'WantedBy=multi-user.target' | sudo tee /etc/systemd/system/x11vnc.service
sudo systemctl daemon-reload && sudo systemctl enable x11vnc
sudo firewall-cmd --permanent --add-service=vnc-server && sudo firewall-cmd --reload
3) Verify x11vnc. The service is enabled to start at boot; it runs once
testeris auto-logged in to an Xorg :0 desktop (after the next reboot). Confirm it is enabled now, and after that reboot confirm it is running and listening on port 5900:systemctl is-enabled x11vnc # after a reboot into the graphical desktop (x11vnc does not listen in text mode): systemctl status x11vnc sudo ss -ltnp | grep 5900 -
Install Phoronix and the benchmark tests.
1) Install the Phoronix Test Suite, then let
install-dependenciesinstall the per-distribution test dependencies. Enable EPEL and CRB first (the Phoronix Test Suite and some dependencies live there):sudo dnf install -y dnf-plugins-core epel-release sudo dnf config-manager --set-enabled crb sudo dnf install -y phoronix-test-suite php-gd phoronix-test-suite version sudo phoronix-test-suite install-dependencies pts/x264-1.9.0 pts/x264-opencl pts/unigine-tropicsNote: On RHEL-family systems,
install-dependenciesinstalls the 32-bit (.i686) libraries but may still report the 32-bit compatibility libraries as missing. This is a known false report (they are in fact installed), so when prompted choose 1 (Ignore missing dependencies and proceed).2) In a
testershell (SSHsu - testeris fine for install; the graphical Unigine Tropics test is installed and run later inside the VNC session), install the benchmarks. Usepts/x264-1.9.0, because the newer x264 profiles' Bosphorus video source is no longer available:Note:
These steps might take a while. You must agree to the terms of the Phoronix Test Suite, but anonymous statistics reporting is not mandatory.
If an OpenCL dependency regarding opencl-headers is reported when you install
pts/x264-opencl, ignore the warning and continue the installation. It is already manually installed.phoronix-test-suite install pts/x264-1.9.0 pts/x264-opencl3) If
pts/x264-1.9.0orpts/x264-openclfail to build with a PIE relocation error, patch the configure call and reinstall:sed -i 's#\./configure #./configure --extra-cflags="-fno-PIE" --extra-ldflags="-no-pie" #' ~/.phoronix-test-suite/test-profiles/pts/x264-1.9.0/install.sh sed -i 's#\./configure #./configure --extra-cflags="-fno-PIE" --extra-ldflags="-no-pie" #' ~/.phoronix-test-suite/test-profiles/pts/x264-opencl-1.9.1/install.sh phoronix-test-suite install pts/x264-1.9.0 pts/x264-opencl
Certifying GPU pass-through
Certifying GPU pass-through requires that you do these tests with Windows VMs or Linux VMs.
Certifying GPU pass-through for Windows VMs
Before running the tests, complete Prepare a Windows VM to build the VM and set up remote access. Then complete the setup below and run the tests that follow.
Configure pass-through for a Windows VM
- Shutdown the VM.
- In XenCenter, right-click on the VM and select Properties. The VM Properties dialog appears.
-
In the VM properties, select the GPU tab and choose the appropriate GPU from the list.
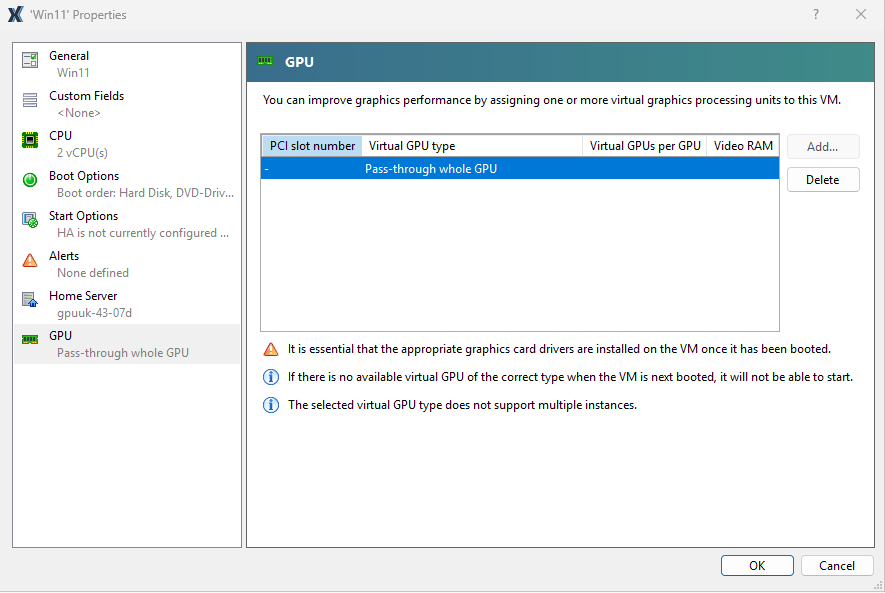
-
Boot the VM, connect to it through Remote Desktop.
- Install the latest Windows GPU driver from the appropriate vendor.
- Verify the GPU is displayed correctly in the Windows Device Manager.
Set up a display for the passed-through GPU
Use a Virtual Display Driver (VDD) to create a virtual monitor that the passed-through GPU renders, then view and drive that session with a GPU-capable streaming tool.
Note: If your GPU has physical display outputs, you can instead attach a physical monitor or an HDMI/DisplayPort dummy plug (EDID emulator) to the GPU and skip the VDD. The VDD is required only for headless cards.
-
Install the Virtual Display Driver.
Download the 64-bit (x64) "Driver Only" VDD package from https://github.com/VirtualDrivers/Virtual-Display-Driver/releases (a stable release, not one marked Pre-release) and copy the
VirtualDisplayDriverfolder toC:\VirtualDisplayDriver.The driver is self-signed, so first trust its certificate in an elevated PowerShell (otherwise Windows blocks the install):
$c = (Get-AuthenticodeSignature C:\VirtualDisplayDriver\MttVDD.cat).SignerCertificate
Export-Certificate -Cert $c -FilePath C:\VirtualDisplayDriver\vdd.cer | Out-Null
Import-Certificate -FilePath C:\VirtualDisplayDriver\vdd.cer -CertStoreLocation Cert:\LocalMachine\Root | Out-Null
Import-Certificate -FilePath C:\VirtualDisplayDriver\vdd.cer -CertStoreLocation Cert:\LocalMachine\TrustedPublisher | Out-Null
In Device Manager, choose Action → Add legacy hardware → Install the hardware that I manually select from a list (Advanced) → Display adapters → Have Disk..., then select
C:\VirtualDisplayDriver\MttVDD.inf.The install prompts for a restart. After the VM reboots, Device Manager → Display adapters shows the Virtual Display Driver.
-
Make the VDD the primary display.
Disable the emulated adapter (elevated PowerShell):
Get-PnpDevice -Class Display | Where-Object { $_.FriendlyName -match 'Basic Display' } | Disable-PnpDevice -Confirm:$falseNote: This blanks the XenCenter console and persists across reboots. Keep a remote path (Remote Desktop or PowerShell Remoting) available to re-enable it with
Enable-PnpDevice. -
View and drive the GPU-rendered session.
Connect to the GPU-rendered desktop with the GPU-capable connection you set up in Set up a Windows VM.
Windows VM performance evaluation
Run WinSAT in the GPU-rendered session set up above.
-
Create the results files in an elevated Command Prompt (writing to the
C:\root requires elevation; use a plain hyphen-):winsat dwm -xml C:\wsdwm.xml winsat formal -xml C:\wsformal.xml -
Move
C:\wsdwm.xmlandC:\wsformal.xmlto a separate location. These files are required for certification and might be overwritten by later steps. -
Reboot the VM, run WinSAT again (step 1), and move the second set of results to a separate location.
-
Validate that the GPU is passed through by checking it in the Windows Device Manager (no Code 43).
Test the Windows VM benchmark
This test can be run on any single supported Windows OS.
- Launch the previously installed Unigine Tropics benchmark application from the Start menu or desktop icon.
-
In the launcher window, set the following values:
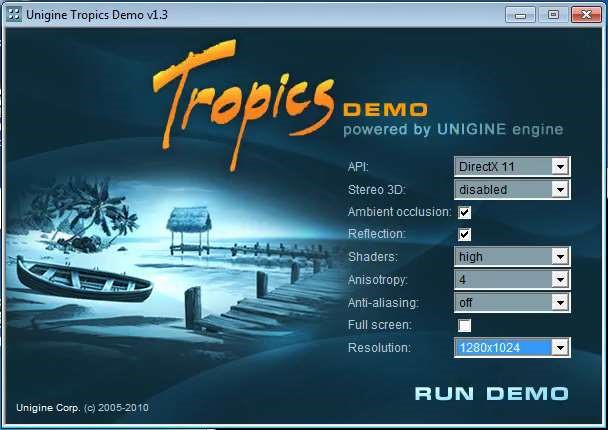
- API: DirectX 11
- Stereo 3D: disabled
- Ambient occlusion: selected
- Reflection: selected
- Shaders: high
- Anisotropy: 4
- Anti-aliasing: off
- Fullscreen: not selected
- Resolution: 1280x1024
-
Click Run Demo.
- Allow the test to continue for half an hour to ensure that the system is stable for this period of time. Any hangs/crashes during this period invalidate the certification result.
- Reboot your virtual machines.
- Run the Unigine Tropics benchmark again as described in the previous steps.
- Validate that the GPU is passed through correctly by checking the Windows Device Manager for the passed-through GPU.
- Watch for any major differences in performance or compatibility between the VM reboots.
- Take a screenshot and attach it to the submission ticket.
Test Windows VM crash and recovery
The following steps aim to verify that a Windows blue screen crash is visible through XenCenter and that the Virtual Desktop recovers correctly from a full memory dump.
This test only needs to be performed for a single VM. Perform it with the maximum number of GPUs passed through.
- In the same VM used for the previous test, set the
CrashDumpEnabledregistry entry to1in the following registry sub-key:HKEY_LOCAL_MACHINE\SYSTEM\CurrentControlSet\Control\CrashControl. - Reboot the VM.
- Click Start, right-click Computer, and then click Properties. Click Advanced system settings.
- In the Startup and Recovery section, select Settings.
- Set the Write debugging information to Complete memory dump. Also make sure that the Automatically Restart option is turned off.
-
In the XenServer console, run the following commands to trigger an NMI crash:
xe vm-listThis command returns the UUID for all VMs. Locate the UUID of your test VM.
list_domains | grep <VM UUID>That row's first column is the numeric domain ID (domid); use it in the next command.
/usr/sbin/xen-hvmcrash <domid>If
/usr/sbin/xen-hvmcrashis not present on your host, use/usr/lib/xen/bin/xen-hvmcrashinstead (confirm withwhich xen-hvmcrash). -
Take a screenshot of the blue screen (PrtScn) that is visible on the XenCenter VM console and include it in the submission.
It is expected behavior to lose connection to the Virtual Desktop.
-
After the memory dump is complete and the VM has rebooted, reconnect to the Virtual Desktop and verify the following:
- The GPU is still passed through correctly by checking the Windows Device Manager for the passed-through GPU.
- Windows Aero is still enabled and displays no visible artifacts.
More information about forcing an NMI crash on XenServer can be found on the Citrix website https://support.citrix.com/support-home/kbsearch/article?articleNumber=CTX123177.
Certifying GPU pass-through for Linux VMs
Before running the tests, complete Prepare a Linux VM for your distribution to create the VM, configure remote access, and install the benchmarks. Then assign the GPU, install the driver, configure the display, and run the functional test below.
-
Assign a pass-through GPU.
Before installing the GPU guest driver, assign a GPU to the VM. With the VM shut down, in XenCenter open the VM's GPU tab (or Properties → GPU), select a pass-through GPU, then start the VM.
-
Install the GPU guest driver and verify that it works. The following example is for NVIDIA graphics cards.
Note: Installing the driver switches the VM to text mode, so x11vnc/VNC is unavailable during the driver installation. Run these steps over SSH; graphical access (and VNC) returns after the Configure the display step below.
Ubuntu: (see https://documentation.ubuntu.com/server/how-to/graphics/install-nvidia-drivers/)
1) Install the dependency packages:
sudo apt-get update
sudo apt-get install -y build-essential linux-headers-$(uname -r) dkms
2) Disable nouveau by writing the blacklist file:
echo 'blacklist nouveau' | sudo tee /etc/modprobe.d/blacklist-nouveau.conf
echo 'options nouveau modeset=0' | sudo tee -a /etc/modprobe.d/blacklist-nouveau.conf
3) Rebuild the initramfs:
sudo update-initramfs -u4) Switch to text mode and reboot:
sudo systemctl set-default multi-user.target
sudo reboot
5) After the reboot, confirm nouveau is disabled (no output means success):
lsmod | grep nouveau6) Install the NVIDIA driver. Obtain the
.runinstaller for your driver version from the NVIDIA vGPU/Licensing Portal and replace<version>with the actual version (for example595.71.05). When prompted for the kernel module type, choose MIT/GPL (open) for Turing or newer GPUs. These steps are for BIOS boot and UEFI boot; for UEFI Secure Boot, see https://docs.xenserver.com/en-us/xenserver/9/vms/linux.html#install-third-party-drivers-on-your-secure-boot-linux-vm.sudo bash NVIDIA-Linux-x86_64-<version>-grid.run7) Verify that the NVIDIA driver is installed successfully:
nvidia-smi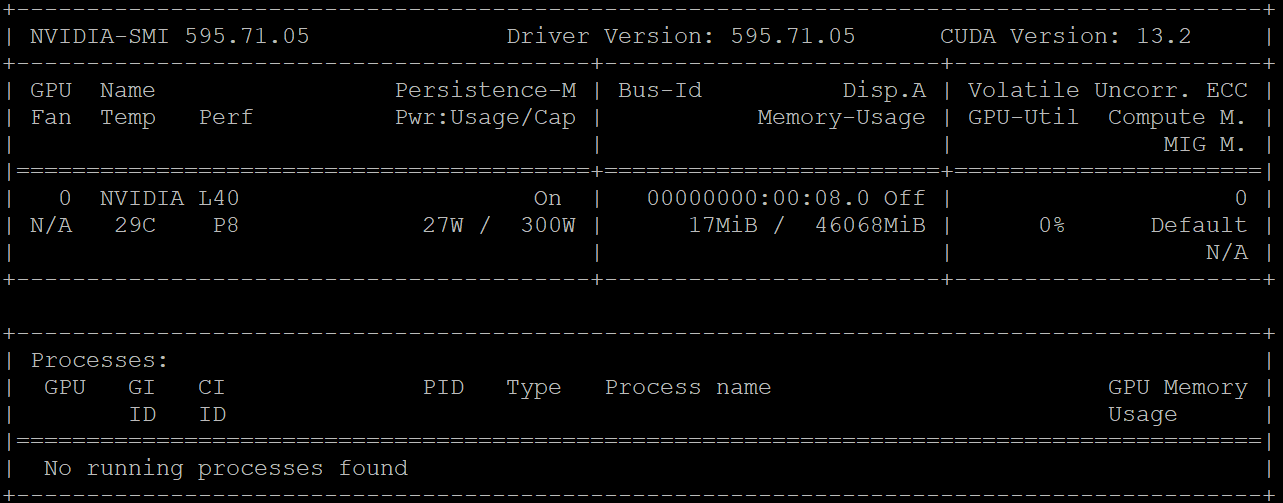
Non-Ubuntu (Rocky Linux):
Note: The NVIDIA guest driver supports only a bounded kernel range, so the Rocky Linux point release must be one the chosen driver version supports (see the driver's release notes). A point release newer than the driver supports will fail the kernel-module build.
1) Enable the required repositories and install the build dependencies (
curl-minimalis present by default butwgetis not; CRB and EPEL are needed later for build tools and x11vnc):sudo dnf install -y dnf-plugins-core epel-release sudo dnf config-manager --set-enabled crb sudo dnf install -y gcc gcc-c++ make elfutils-libelf-devel wget2) Install
kernel-develandkernel-headersthat match the running kernel. On a superseded point release the live repo has already moved on (9.7 → 9.8), so pull them from the vault if the live repo has no match. Replace9.7with your point release if different:V=$(uname -r) sudo dnf install -y "kernel-devel-$V" "kernel-headers-$V" || { wget https://dl.rockylinux.org/vault/rocky/9.7/AppStream/x86_64/os/Packages/k/kernel-devel-$V.rpm wget https://dl.rockylinux.org/vault/rocky/9.7/AppStream/x86_64/os/Packages/k/kernel-headers-$V.rpm sudo dnf install -y ./kernel-devel-$V.rpm ./kernel-headers-$V.rpm } ls /usr/src/kernels/$V The `ls` must list the directory before you continue; otherwise the `.run` build fails with "Unable to find the kernel source tree".3) Disable nouveau by writing the blacklist file:
echo 'blacklist nouveau' | sudo tee /etc/modprobe.d/blacklist-nouveau.conf
echo 'options nouveau modeset=0' | sudo tee -a /etc/modprobe.d/blacklist-nouveau.conf
4) Rebuild the initramfs (RHEL-family uses dracut, not update-initramfs), add the kernel command line, switch to text mode, and reboot:
sudo grubby --update-kernel=ALL --args="rd.driver.blacklist=nouveau modprobe.blacklist=nouveau nouveau.modeset=0"
sudo dracut --regenerate-all --force --omit-drivers nouveau
sudo systemctl set-default multi-user.target
sudo reboot
5) After the reboot, confirm nouveau is disabled (no output means success):
lsmod | grep nouveau6) Install the NVIDIA driver. Obtain the
.runinstaller for your driver version from the NVIDIA vGPU/Licensing Portal and replace<version>with the actual version (for example595.71.05). When prompted for the kernel module type, choose MIT/GPL (open) for Turing or newer GPUs. These steps are for BIOS boot and UEFI boot; for UEFI Secure Boot, see https://docs.xenserver.com/en-us/xenserver/9/vms/linux.html#install-third-party-drivers-on-your-secure-boot-linux-vm.sudo bash NVIDIA-Linux-x86_64-<version>-grid.run7) Verify that the NVIDIA driver is installed successfully:
nvidia-smi -
Configure the display (pass-through only).
Ubuntu:
1) (Pass-through only) Point X at the GPU, switch back to graphical mode, and reboot. Get the BusID from
nvidia-smi --query-gpu=pci.bus_id --format=csv(for example00000000:00:08.0→PCI:0:8:0):sudo nvidia-xconfig --allow-empty-initial-configuration --enable-all-gpus --busid=PCI:0:8:0 sudo systemctl set-default graphical.target sudo rebootNote:
For pass-through, the XenCenter console goes blank after this. This is expected; connect through the VNC session instead.
2) Connect with a VNC viewer (directly to
<guest-ip>, or through an SSH tunnel:ssh -L 5900:localhost:5900 tester@<guest-ip>, then point the viewer atlocalhost). In the session, confirm the GPU is used:glxinfo | grep -i "OpenGL renderer" The output must show **NVIDIA** (not `llvmpipe`).Non-Ubuntu (Rocky Linux):
1) (Pass-through only) Point X at the GPU, switch back to graphical mode, and reboot. Get the BusID from
nvidia-smi --query-gpu=pci.bus_id --format=csv(for example00000000:00:08.0→PCI:0:8:0):sudo nvidia-xconfig --allow-empty-initial-configuration --enable-all-gpus --busid=PCI:0:8:0 sudo systemctl set-default graphical.target sudo rebootNote:
For pass-through, the XenCenter console goes blank after this. This is expected; connect through the VNC session instead.
2) Connect with a VNC viewer (directly to
<guest-ip>, or through an SSH tunnel:ssh -L 5900:localhost:5900 tester@<guest-ip>, then point the viewer atlocalhost). In the session, confirm the GPU is used:glxinfo | grep -i "OpenGL renderer" The output must show **NVIDIA** (not `llvmpipe`).
Run the functional test
Run the installed benchmarks in the VNC session. Input an appropriate name for each run when asked. When screen resolution is required, you must choose 1024x768. You do not need to run tests on all of the available screen resolutions or full screen.
Note:
If there are multiple GPUs in your system, ensure that the correct graphics is used for the test.
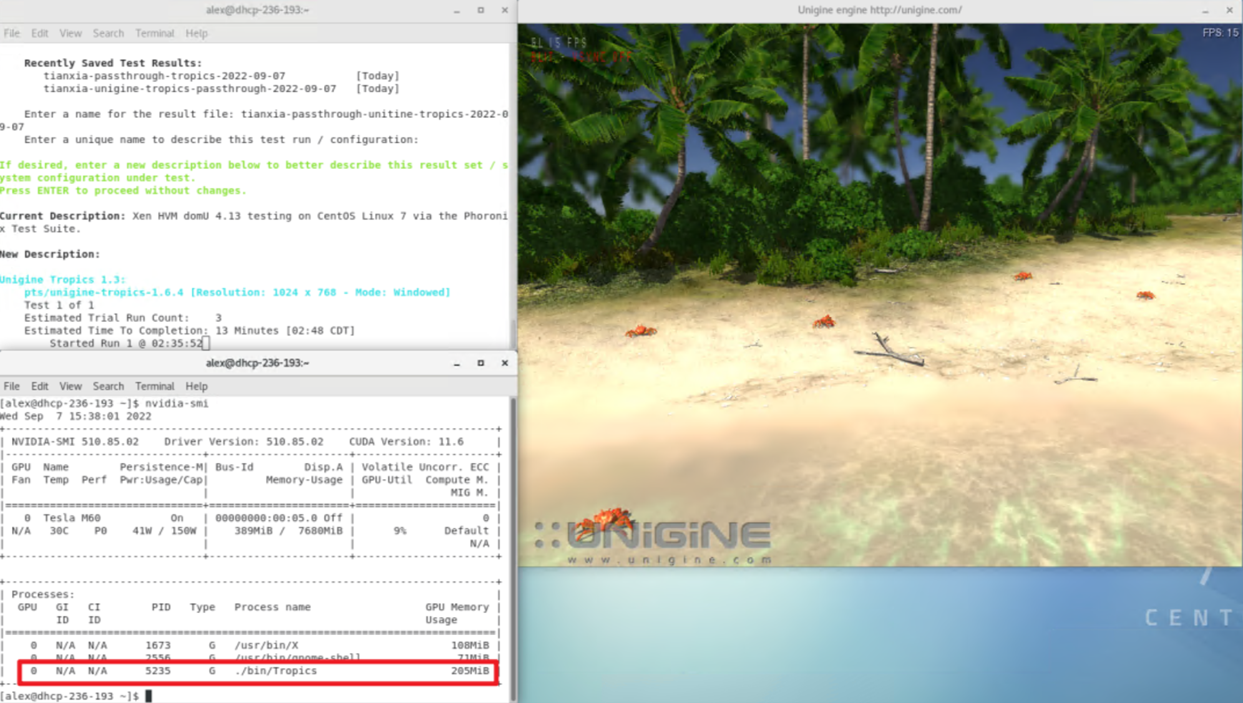
phoronix-test-suite install pts/unigine-tropics
phoronix-test-suite run pts/x264-1.9.0
phoronix-test-suite run pts/x264-opencl
phoronix-test-suite run pts/unigine-tropics
Collect the test results
Archive the test results into a single file test-results.tgz for submission with the following command:
tar -chzf ~/test-results.tgz ~/.phoronix-test-suite/test-results
Certifying vGPU
Certifying vGPU is optional for certifying a GPU card, but is required to list the vGPU feature for that GPU card in the HCL. vGPU depends on guest operating system support; for the list of XenServer 9 guest operating systems that support vGPU, see https://docs.xenserver.com/en-us/xenserver/9/graphics.html.
Note:
Testing multiple vGPUs on a single VM is optional. Do it only if the card supports assigning more than one vGPU to a VM.
Certifying vGPU for Windows VMs
Virtual GPUs (vGPUs) are physical GPUs that have had their resources partitioned to enable multiple VMs to use a single physical GPU. For vGPU cards that support multiple configurations, you only need to certify a single non-pass-through configuration.
You can use vGPU with XenServer without a license (Trial Edition), but only in pools of up to three hosts. If you want to complete this certification in a larger pool, you must deploy a Citrix License Server to host your license. For more information, see https://docs.xenserver.com/en-us/xenserver/9/overview-licensing.
Configure the vGPU test environment
Set up a two-host pool, install the vGPU host driver, and create a vGPU-enabled VM. The migration test only needs to be run on one supported Windows VM operating system.
Note:
The two-host pool and shared SR are required only for the migration test. The multiple-vGPU test needs only a single host with the vGPU host driver and one VM.
-
If you are planning to test GPU pass-through certification, we recommend that you complete pass-through testing before continuing with the remainder of the vGPU certification kit.
-
For vGPU certification, set up two hosts using the same GPU card.
-
Create a pool with two hosts:
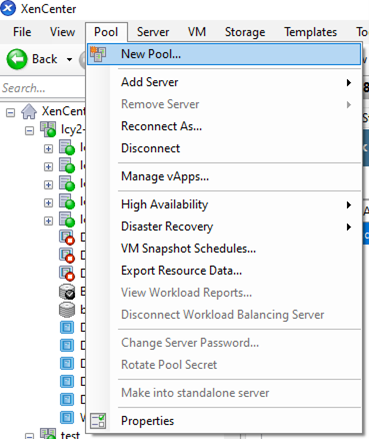
1) Create a pool with XenCenter: click Pool -> New Pool.
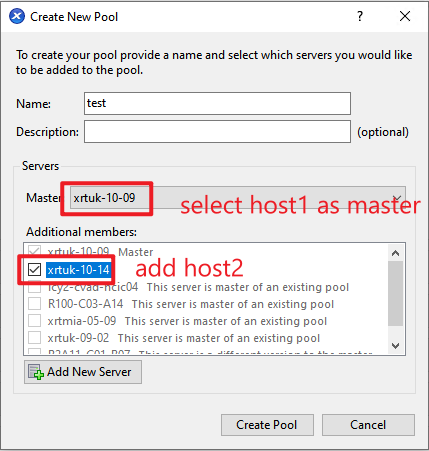
2) Select the hosts that you set up in the previous steps.
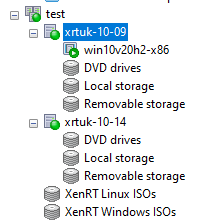
3) Click Create Pool to finish. After this step, you see a pool with two hosts in XenCenter.
-
Install all available updates on the pool and reboot the hosts.
-
Install any vendor-specific host drivers on the XenServer and reboot the host. Refer to the following example steps to install the NVIDIA host driver:
1) Download the driver:
wget https://<Path-to-Download>/NVIDIA-vGPU-xenserver-9-<version>.iso2) Install the driver on the host:
xe-install-supplemental-pack NVIDIA-vGPU-xenserver-9-<version>.iso3) Restart the XenServer host.
reboot4) After you restart the XenServer host, verify that the software has been installed and loaded correctly by checking the NVIDIA kernel driver:
lsmod | grep nvidia5) Verify that the NVIDIA kernel driver can successfully communicate with the NVIDIA physical GPUs in your host. Run the nvidia-smi command to produce a listing of the GPUs in your platform similar to:
nvidia-smi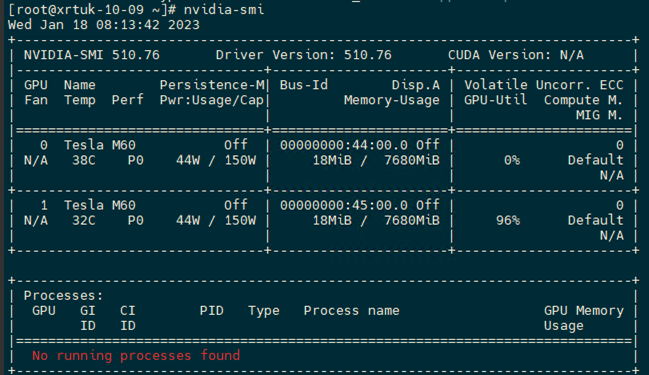
-
Ensure steps 4 and 5 are completed for all hosts in the pool. Your hosts must use the same XenServer and driver version, and each host must be rebooted.
-
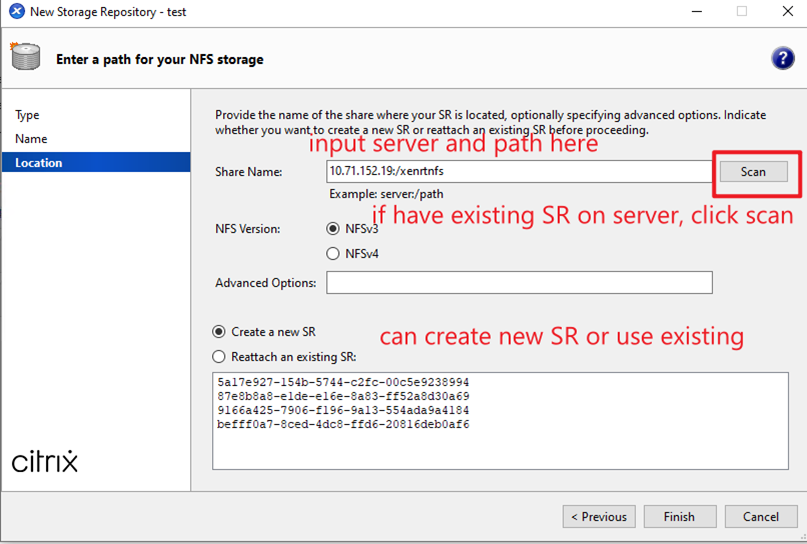
We recommend that you create a shared storage repository (SR) if available and put the VM's disk onto this shared storage. This speeds up VM migration. The following example steps show you how to create a new SR in your pool:
1) Right-click the pool name on XenCenter and select New SR.
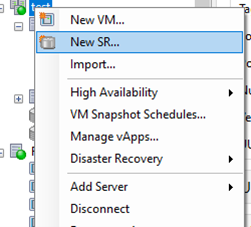
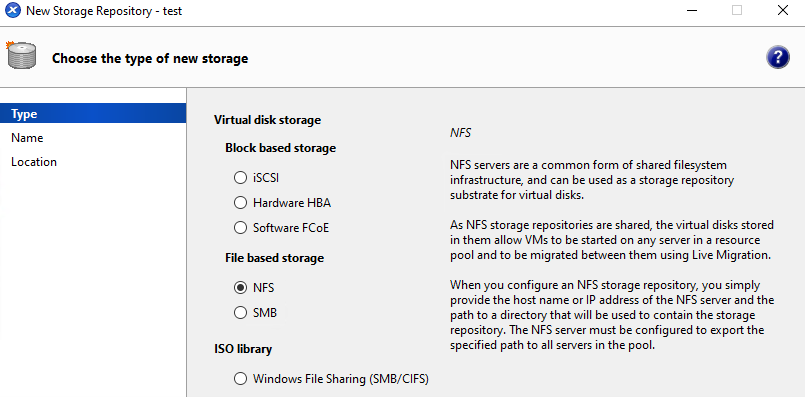
2) Here is an example for NFS, select NFS and click Next.
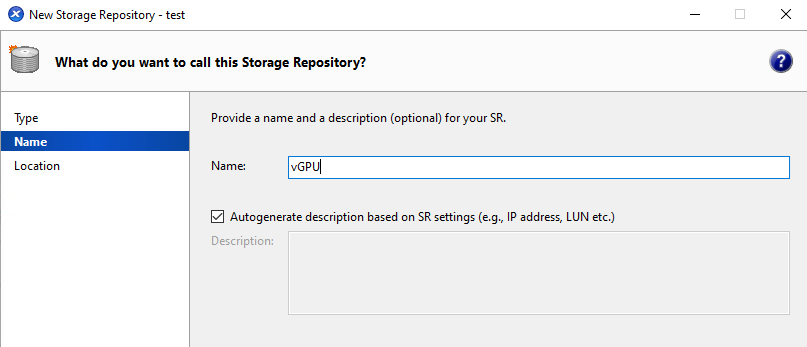
3) Input the SR name and click Next.
4) Input the Share Name and click Finish.
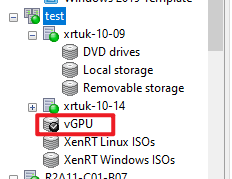
5) You can find this SR in the pool on XenCenter:
-
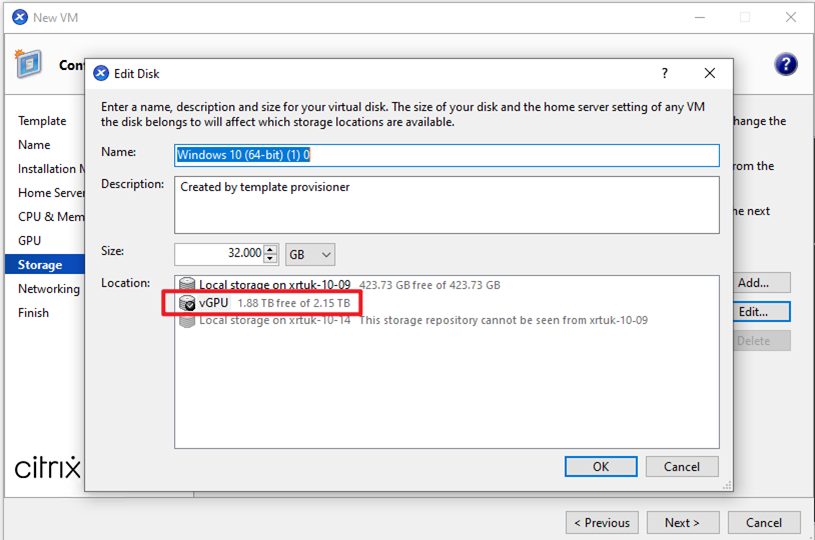
Using XenCenter, create a VM on host1 and select the shared SR that you created as storage. For more information, see the product documentation.
-
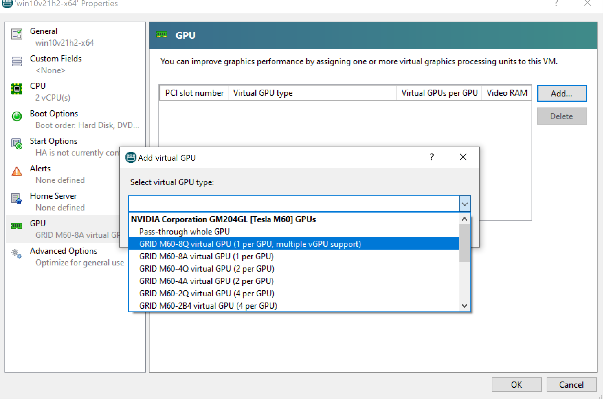
When adding the GPU type to the VM, ensure that a non-pass-through GPU is selected, for example:
Note:
Choose a vGPU type with ≥256 MB memory.
-
Download and install the vendor-specific guest drivers on the VM.
- Reboot the VM.
- After reboot, ensure that the vGPU works well. For example, check the GPU in Task Manager.
Verify the vGPU migration functionality
With the environment configured, verify vGPU migration.
-
Verify vGPU migration without a workload:
1) Right-click on the VM in XenCenter. Choose Migrate to Server and select host2.
Note:
If the VM's disk was placed on the SR, you do not need to complete the following three substeps in the migration wizard. The VM migration starts immediately.
2) Select the pool and VM:
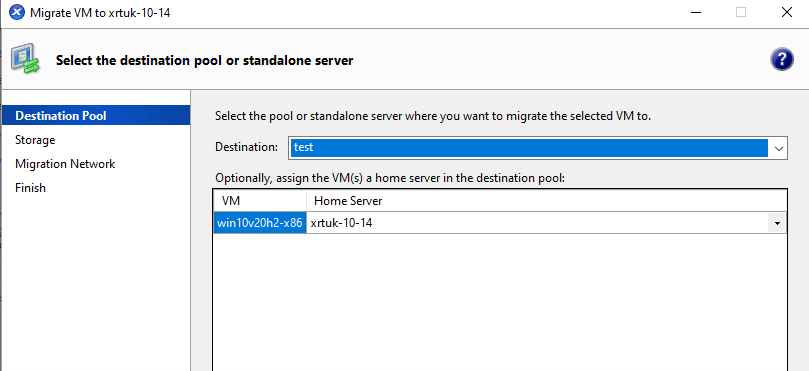
3) Setup storage and click Next.
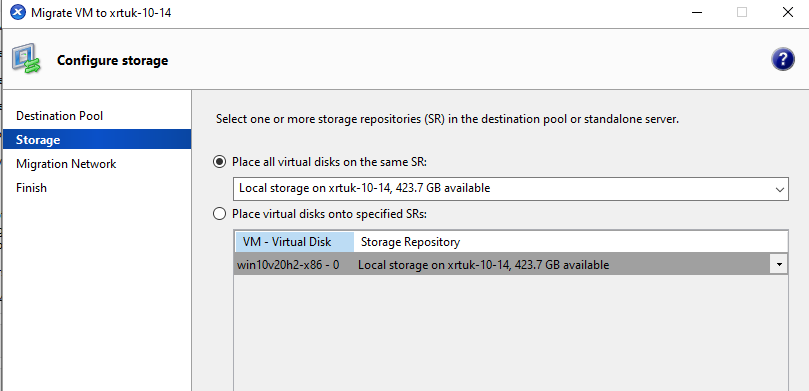
4) Setup the Migration Network and click Next.
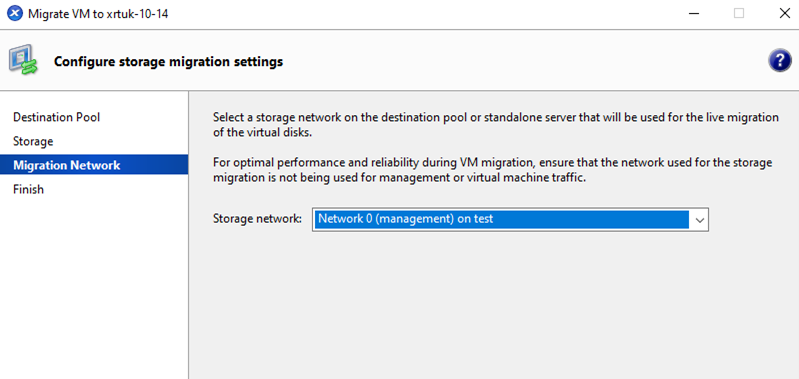
5) Click Finish to start the migration. Wait until the migration process finishes.
6) Go to XenCenter > Notifications > Events to check the migration has completed. Take a screenshot as shown and include it in the submission:

7) You can now see the VM on host2 in XenCenter. Take a screenshot as shown and include it in the submission:
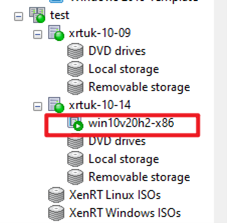
8) After VM migration, reboot the VM.
9) Run the benchmark test. For instructions, refer to the section Test the Windows VM benchmark in Certifying GPU pass-through for Windows VMs.
-
Verify vGPU migration with a workload:
1) Run Unigine Tropics using the VM on host2.
2) While Unigine Tropics is running, migrate the VM from host2 to host1.
3) Take a screenshot of XenCenter including that VM console while running Unigine Tropics during VM migration and include it in the submission.
4) Take a screenshot of XenCenter when VM migration is completed and include it in the submission.
-
Submit the collected results according to the Submit Test Results section.
Verify the vGPU scalability
This test verifies that the system operates at full scale.
- Create three VMs of the supported operating system types.
- Assign vGPUs to each of the VMs.
- Install the XenServer VM Tools and the vendor's graphics drivers on each VM.
- Ensure that the vGPU is in use for each VM.
- Shutdown all the VMs.
- Clone a random selection of VMs up to the capacity of the entire GPU card. For example, for a card containing four physical GPUs, which is being partitioned into two vGPUs, create 8 VMs.
- Boot all the VMs.
-
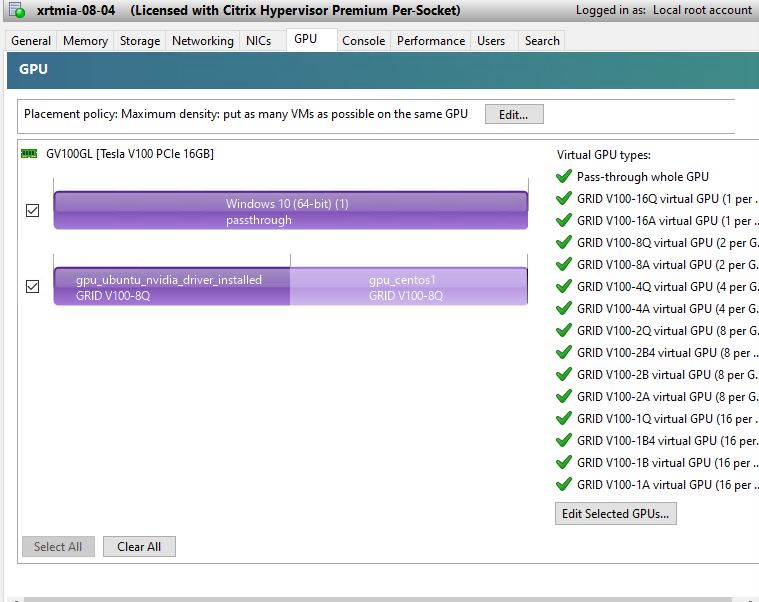
Verify that all the physical GPUs are occupied. In XenCenter, select the host and choose the GPU tab.
On the GPU tab, ensure that all the physical GPUs indicate they are in use (purple) and that no empty vGPU slots displayed (dark grey). The following screenshot shows a partially occupied GPU card:
-
Verify that each VM has booted properly and is usable. Any failures to boot - blue screens, and so on - invalidate the test. Take a screenshot of the failure and include it in the submission.
Certifying multiple vGPU for Windows VMs
Multiple vGPU enables multiple virtual GPUs to be used concurrently by a single VM. Only certain vGPU profiles can be used and all vGPUs attached to a single VM must be of the same type. These additional vGPUs can be used to perform computational processing. For more information about the number of vGPUs supported for a single VM, see Configuration Limits.
This feature is only available for NVIDIA GPUs. For more information about the physical GPUs that support the multiple vGPU feature, see the NVIDIA documentation.
Same as certifying a single vGPU for Windows VMs, to certify multiple vGPU you must prepare a pool, install the vGPU host driver, and set up a Windows VM. Refer to the steps in the section Configure the vGPU test environment to prepare the test environment.
The difference is that you assign multiple vGPUs to a single Windows VM. The following steps give an example for adding multiple vGPUs to a single VM:
- Shutdown the Windows VM.
- Right-click on the VM in XenCenter and select Properties.
-
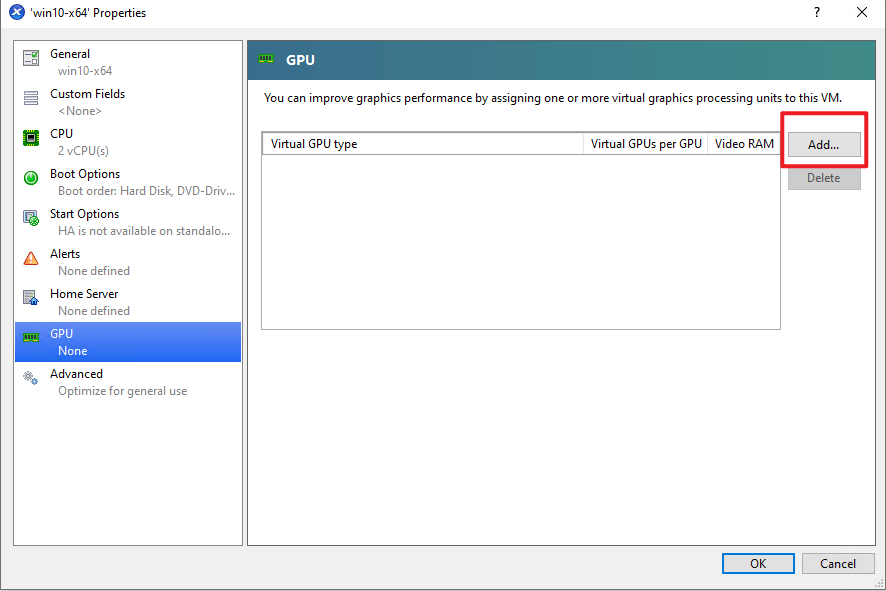
In the Properties window, click the GPU tab to add vGPU for VM. Here is an example with an NVIDIA M60 GPU card:
-
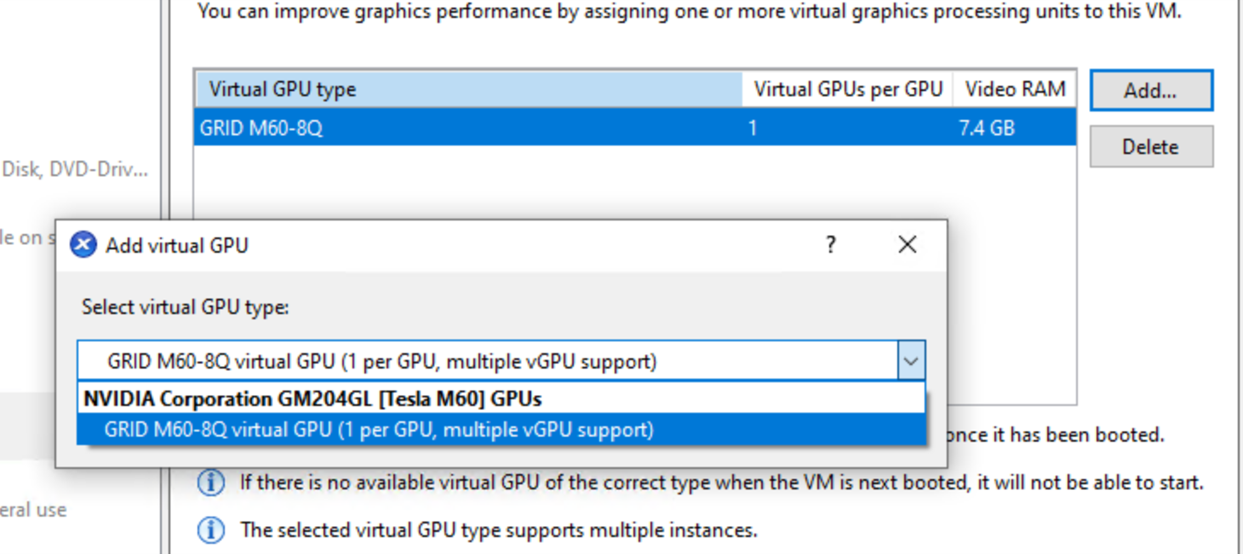
Click Add and select GRID M60-8Q to add one vGPU first. It shows "1 per GPU, multiple vGPU support", then click Add again to add one more vGPU to the VM.
-
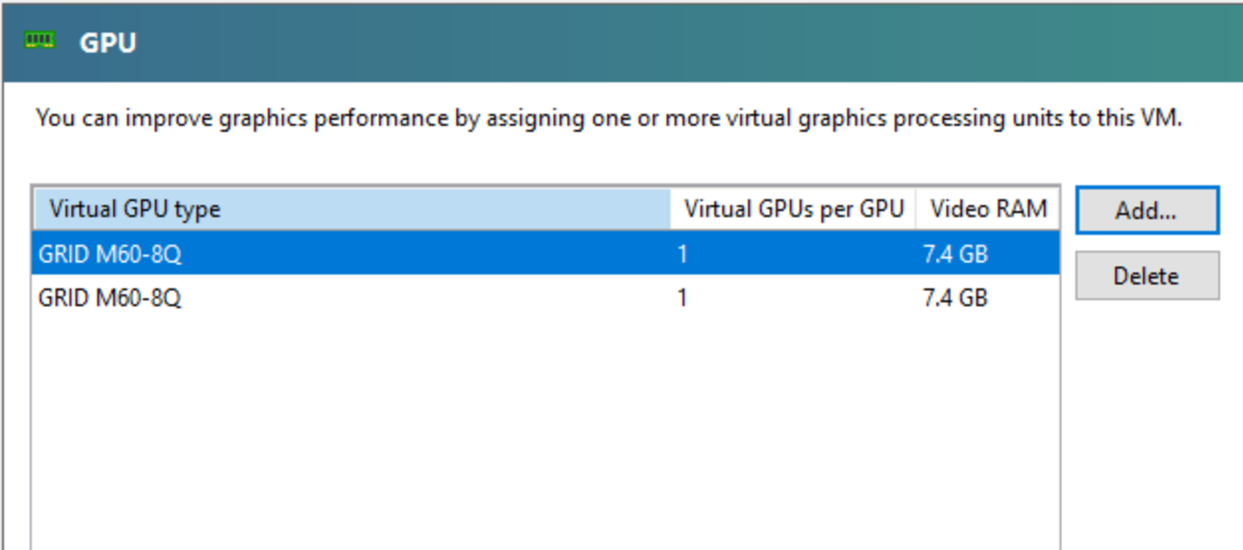
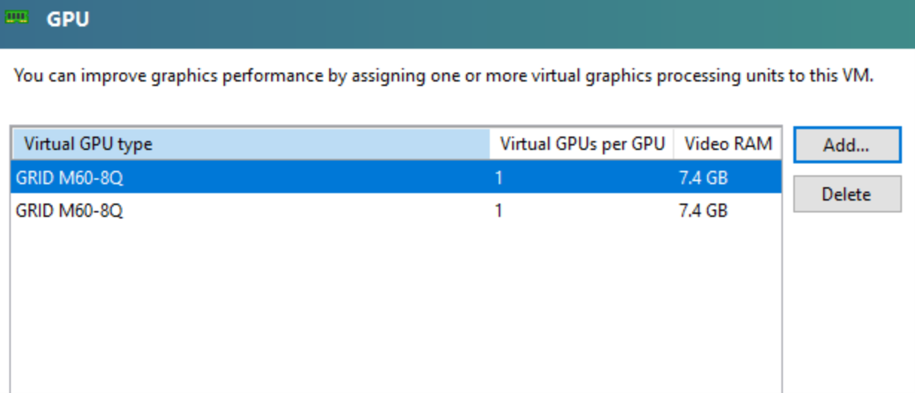
You can now see that there are two vGPUs in the VM. Take a screenshot and add this to the test report.
-
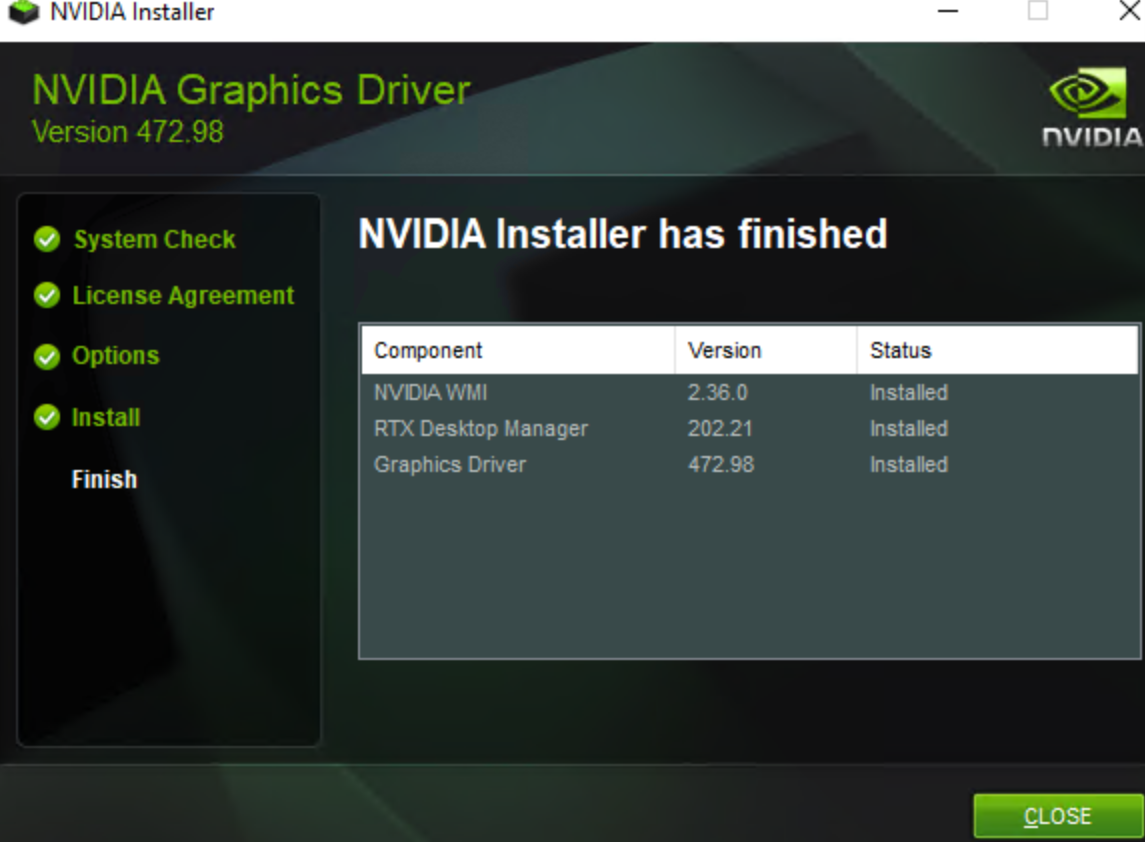
Start the VM and install a guest driver for it.
-
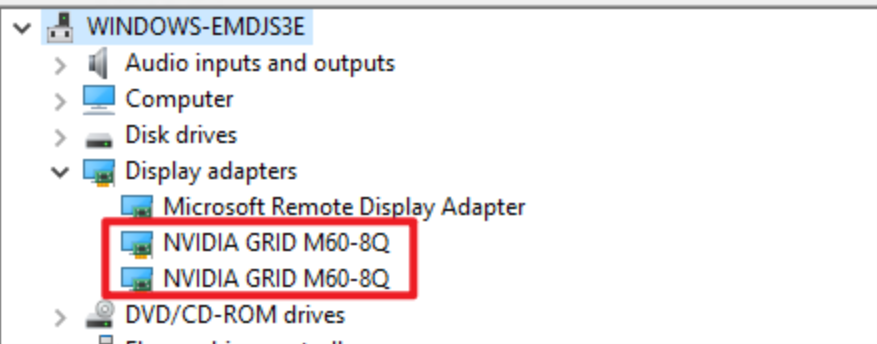
After the driver is installed, check the vGPUs in the device manager. There are two NVIDIA GRID M60-8Q vGPUs.
-
You can now run the GPU certification test with the multiple vGPUs assigned. For multiple vGPU, run the functional and benchmark test only. Migration and scalability do not apply to a single VM that has multiple vGPUs.
1) Verify that the VM sees all the assigned vGPUs: in Device Manager → Display adapters all the NVIDIA vGPUs are listed, and
nvidia-smiinside the VM lists them.2) Run the benchmark test (Unigine Tropics) as described in the section Test the Windows VM benchmark in Certifying GPU pass-through for Windows VMs.
3) Submit a screenshot that shows the multiple vGPUs assigned to the VM (Device Manager or the XenCenter GPU tab) together with the benchmark results. See the Submit test results section.
Certifying vGPU for Linux VMs
Note:
Certifying vGPU for Linux is optional. Complete it only if you want the card's vGPU capability listed on the HCL.
Certifying vGPU for Linux guests uses the same procedure as GPU pass-through. Complete Prepare a Linux VM (create the VM, install the driver, configure remote access, and install the benchmarks) and then Certifying GPU pass-through for Linux VMs (run the tests and collect the results). In the GPU-assignment step, select a vGPU type instead of a pass-through GPU; the display-configuration step (nvidia-xconfig) is not required for vGPU.
Verify the vGPU scalability
This section can be skipped if you already verified vGPU scalability for a Windows guest. Please refer to the steps in Certifying vGPU for Windows VMs and Verify the vGPU scalability for remaining steps.
Certifying multiple vGPU for Linux VMs
To assign multiple vGPUs to a single Linux VM, follow the same procedure as in Certifying multiple vGPU for Windows VMs (shut down the VM, then in Properties → GPU click Add several times to attach multiple vGPUs of the same type). Then run the functional test only. Migration and scalability do not apply to a single VM that has multiple vGPUs.
- Verify that the VM sees all the assigned vGPUs:
nvidia-smiinside the VM lists them, andlspci -kshows the NVIDIA devices. - Run the Linux GPU functional test (
pts/x264-1.9.0,pts/x264-opencl,pts/unigine-tropics, plusglxinfoandlspci -k) as described in the section Run the functional test. - Submit a screenshot that shows the multiple vGPUs assigned to the VM (the XenCenter GPU tab) together with the functional test results. See the Submit test results section.
Submit test results
Upload the test results to the XenServer Tracker website (https://xenserver-tracker.atlassian.net).
If you don't have a Tracker account, you must sign up for one or contact your ATS.
-
Create a ticket for submission.
-
Specify HCL Submission as the issue type.
-
Fill in the information in the
xenserver-gpu-certification-form.docxand upload to the Tracker ticket. -
Generate server status report and upload to Tracker ticket Upload Server Status Report either by exporting it from XenCenter or by running the following command at the XenServer console:
xen-bugtool --yestoall -
Upload test results for Windows VMs For pass-through certification
- Upload the Windows crash screenshots.
- Upload the winsat XML output for each Windows VM.
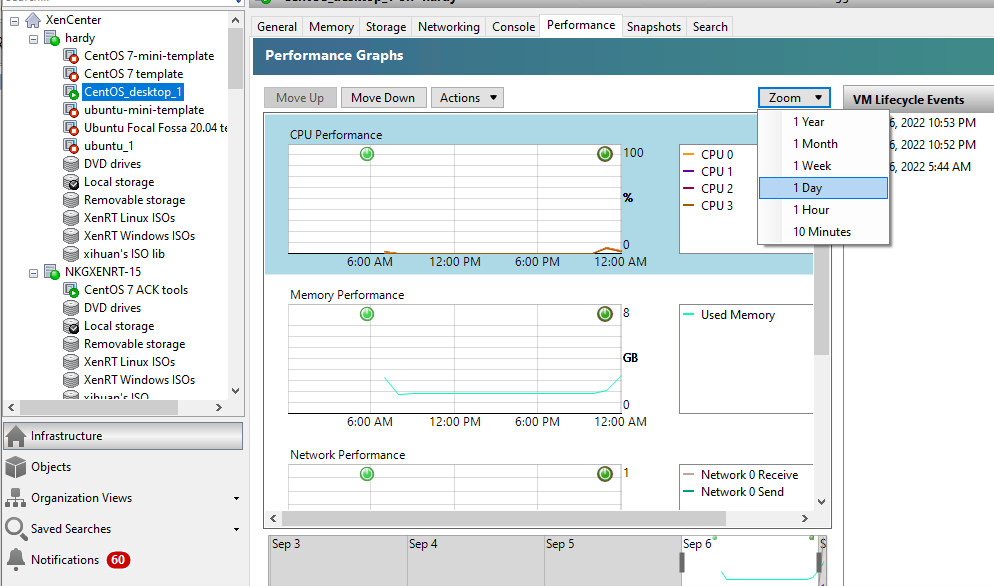
- Upload the XenCenter Performance Tab screenshots for each Windows VM taken during the stress test.
Note:
Ensure the performance data contains the half an hour of results as described in the section Test the Windows VM benchmark.
- Upload the benchmark application results from all test runs.
For vGPUs certification - For vGPU certification, upload two screenshots for VM migration. Refer to the section Verify the vGPU migration functionality. - Upload the XenCenter Performance Tab screenshots for each VM taken during the stress test.
Note:
Ensure the performance data contains the half an hour of results as described in the section Test the Windows VM benchmark.
- Upload the benchmark application results from all test runs.
- For multiple vGPU certification, upload the screenshots of the VM properties > GPU tab on XenCenter that show how many vGPUs are added to VM.
-
Upload test results for Linux VMs For pass-through certification
- Upload the
glxinfoandlspcioutput for each Linux VM. - Upload
/var/log/kern.logfile of each Linux VM. - Upload the benchmark results produced from the
phoronix-test-suiteof each Linux VM.
For vGPU certification - Upload a completed version of the certification form supplied with this kit. - Upload the XenCenter Performance Tab screenshots taken during the stress test.
Note:
Ensure the performance data contains the half an hour of results as described in the section Run the functional test.
- Upload the benchmark application results from all test runs.
- For multiple vGPU certification, upload the screenshots of the VM properties > GPU tab on XenCenter that show how many vGPUs are added to VM.
- Upload the
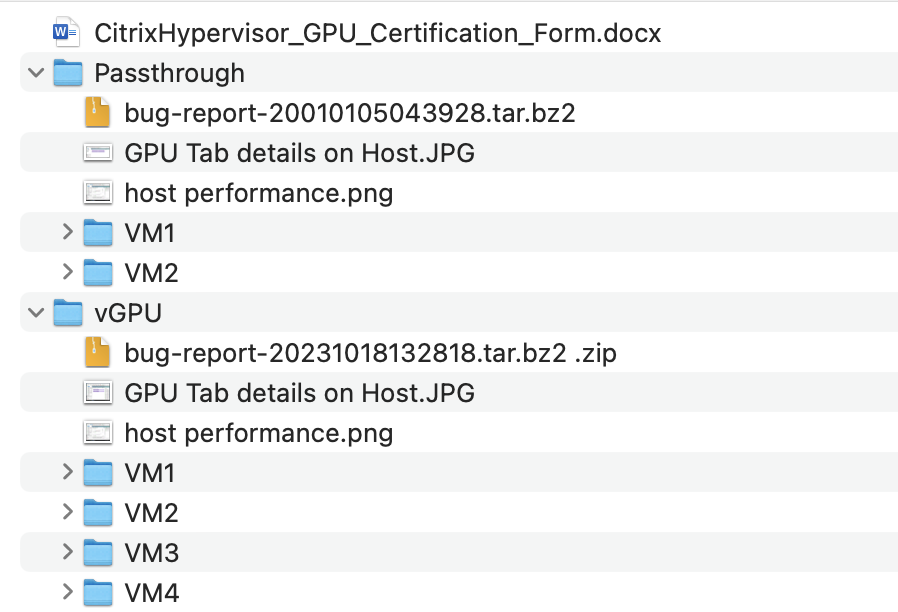
To enable us to process your test results smoothly and efficiently, we recommend storing your test results in a compressed file in a clear structure. Here is an example:
Notice and Disclaimer
The contents of this kit are subject to change without notice.
Copyright © 2026 Cloud Software Group Inc. All rights reserved. This kit allows you to test the products for compatibility with XenServer products. Actual compatibility results may vary. The kit is not designed to test for all compatibility scenarios. Should you use the kit, you must not misrepresent the nature of the results to third parties. TO THE EXTENT PERMITTED BY APPLICABLE LAW, XENSERVER MAKES AND YOU RECEIVE NO WARRANTIES OR CONDITIONS, EXPRESS, IMPLIED, STATUTORY OR OTHERWISE, AND XENSERVER SPECIFICALLY DISCLAIMS WITH RESPECT TO THE KIT ANY CONDITIONS OF QUALITY, AVAILABILITY, RELIABILITY, BUGS OR ERRORS, AND ANY IMPLIED WARRANTIES, INCLUDING, WITHOUT LIMITATION, ANY WARRANTY OF MERCHANTABILITY OR FITNESS FOR A PARTICULAR PURPOSE. YOU ASSUME THE RESPONSIBILITY FOR ANY INVESTMENTS MADE OR COSTS INCURRED TO ACHIEVE YOUR INTENDED RESULTS. TO THE EXTENT PERMITTED BY APPLICABLE LAW, XENSERVER SHALL NOT BE LIABLE FOR ANY DIRECT, INDIRECT, SPECIAL, CONSEQUENTIAL, INCIDENTAL, PUNITIVE OR OTHER DAMAGES (INCLUDING, WITHOUT LIMITATION, DAMAGES FOR LOSS OF INCOME, LOSS OF OPPORTUNITY, LOST PROFITS OR ANY OTHER DAMAGES), HOWEVER CAUSED AND ON ANY THEORY OF LIABILITY, AND WHETHER OR NOT FOR NEGLIGENCE OR OTHERWISE, AND WHETHER OR NOT XENSERVER HAS BEEN ADVISED OF THE POSSIBILITY OF SUCH DAMAGES.